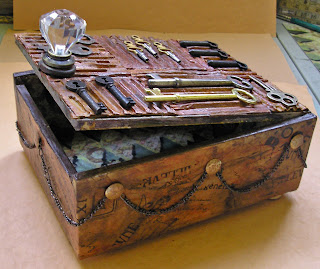
The Kindred Souls group is in the midst of a cigar box swap, and I was lucky enough to be paired with
Neil, an awesome artist from England. We briefly communicated and both decided that whatever each of us did would be fine. I was happy to be making a box for a man, because I don't often get to do that, and I did what I love to do......a little bit vintage, a little bit steampunk, a little bit grunge, and a whole lot of texture. I just mailed the completed box the other day, and it will take about two weeks to reach Neil. So, Neil, if you're reading this and would like to be surprised, step away from the computer or go visit another blog!
Above, a look at the box with the lid partially opened (yes, it closes nicely). And now for some closer looks. First, the top.
I took some corrugated cardboard and ripped off the paper covering one side, then cut it into different sized pieces for the mosaic look. I used inks and stains to color the pieces until I thought they looked suitably grungy, and adhered them with a strong glue. Then I went through my stash of keys, selected some and glued them down. I wanted to attach some sort of knob to the top to aid in opening the box, but the craft knobs I had on hand (lots of them!) didn't have a screw long enough to go through the lid, and I had no screws in my junk drawer that would fit, so I wound up using a finial from an old lamp that worked perfectly. It took a while to get the hole made, but an awl worked fine.

The sides of the box were covered with many scraps of patterned tissue paper and sealed with Ranger's Glue N Seal. Oh, I used that on the top of the box too, by the way. The chain goes all the way around the box and the swags were created by attaching the chain with plain old thumb tacks....which I banged up and colored with permanent ink to get a rusty look.
Decorating the inside of the box was optional, but I just couldn't leave it naked. Here's what it looks like fully opened. And next, photos of the inside of the box and inside of the lid.
For the bottom and sides of the inside I took some patterned paper and altered it with stamps and stencils.
The underside of the lid was covered with
Tim Holtz's tissue tape, which was then colored with both Golden's fluid acrylics and distress inks. And yes, everything was sealed and protected with more Glue N Seal.
I think boxes look nicer if they have some lift, so I added feet.....made from bingo markers. The paper on the bottom of the box is plain old kraft from a disassembled grocery bag. It was inked, crumbled, inked some more and glued down, without smoothing it too much so some of the wrinkles remained. It may not look it in the photos, but I think it resembles leather.
I left this out and opened for DAYS before packing it up (carefully enough, I hope) and sending it across the ocean. Even though everything seemed dry after a few hours, you really want to make sure of that before shipping something like this. I wouldn't want Neil to be unable to open it. Speaking of which, before packing it up I did put a little something inside for Neil to discover. No photo of that, so even if Neil decided to look, something will still be a surprise.


