Showing posts with label art journal. Show all posts

Tuesday, March 10, 2015

DLP 2015, Week 10 -- Make Your Mark

The Documented Life Project
March Theme
Making Your Mark (Doodles & Mark Making)
March 7
Art Challenge:  As A Layer Element
Journal Prompt:  Surviving the Elements

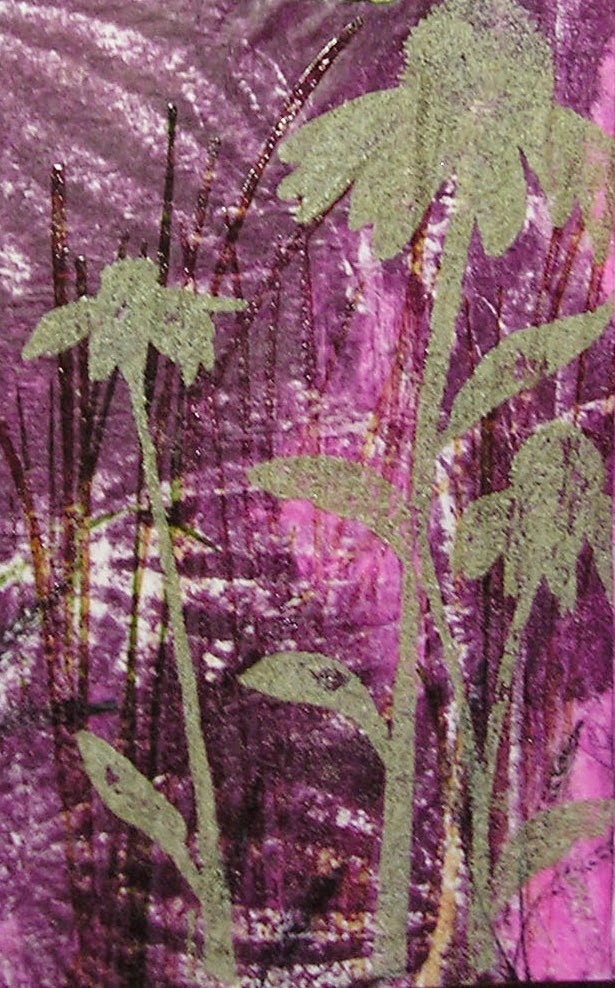
It seems to me that everything I put on paper is a mark, so I just went out of my way to include as many mark making techniques as I could think of.

First mark, paint. Fluid acrylics, to be exact, plopped on the paper and then quickly spread out with a baby wipe. (Learned that technique from Dyan Reaveley, and I love it. What a time saver!)


Next, some drips and splatters of watered down paint, followed by scribbling (more on that in a sec).


For the scribbling, I mixed equal parts of black fluid acrylic paint and airbrush medium, and used this handy little tool.


At this point I got too into the adding of marks and stopped taking photos at each step. Some of the things I used: Portfolio oil pastels, stencils with ink and with paint and also with embossing paste, rubber stamps, bubble wrap, pencils, markers, mica powders.....like I said, just about everything. And that was just on the background.

I also dug out my never ending supply of gelli print scraps, went to the sewing machine, and sewed some wonky flower and leaf shapes. These I cut out, in addition to some minus the stitches. And this crazy garden was born.


The journal prompt is "surviving the elements," and all I could think of is how cold and snowy this winter was, and how looking forward to seeing a flower instead of a snowdrift I am. 

Here are some closer looks. And if they aren't close enough, just click on them. Hopefully, enlarging them won't result in a blurry mess, which has been known to happen.


This was fun for me, because it's not really typical of what I normally do, and the colors are certainly brighter than my usual choices. Which means I operated at least a bit out of my comfort zone, and that's the whole point of these challenges, isn't it? 


Sunday, February 22, 2015

DLP 2015, Week 8 -- It's Worth Repeating

The Documented Life Project, February Theme: Layers You Will Love
Week 8 Art Challenge: Repeating Elements   Journal Prompt: It's Worth Repeating

I love patterns; I repeat design elements all the time. Mainly circles. So I decided to go a bit rectangular this week.

First, I dug out some of my favorite handmade stamps.


Some were carved on regular stamp carving material, three were carved on a pink eraser, one was carved on a wine cork, and one was cut, not carved from adhesive backed fun foam, and stuck to a piece of plastic. Nothing high tech here!

Then I took a piece of rice paper, large enough to cover my two page spread, and lightly penciled in a grid of differently sized squares and rectangles. I stamped different combinations of the above with a permanent black ink, let it dry, and then filled in each segement with color. This is what I used.


I generally (and this time) use the blocks like watercolors. I leave them in the box and just wet them with a brush. I like them because the colors are vivid and when dry, permanent. The rice paper is thin, but sturdy, and when it was completely dry I cut up the segments. I then arranged them in my journal, adhering them with matte medium. Last step.....adding another repeating pattern, dots. Lots and lots of dots.


So, I have a few repeats going on here: the grids, the stamps, the colors, and the dots. As for the journal prompt, what is worth repeating is the word BE. It's good to just be. Be happy. Be kind. Let it be. Just BE.


Thursday, August 28, 2014

A Documented Life - 4 Weeks in a Flash

While I've been keeping up with my Documented Life Project prompts, I've been neglecting this blog. So, here we go, the last four weeks in a flash......

Week 32, use a fortune cookie. I know I have an envelope of them somewhere, but couldn't find it, so faked it with a download. My total inspiration for this was a workshop given by DLP administrator Roben-Marie Smith. I used the insides of security envelopes and gelli print scraps, and a whole lot of doodling.


Week 33, use the underpaper (you know, the paper under your work that collects all the inks, paints and sprays). In my case, the underpaper is the deli wrap paper I used to blot off excess paint on my gelli prints. Over top, some stamping, lettering, doodling, and stitching.


Week 34, use numbers in some way to indicate how the week went. This one really speaks for itself. All in all, a pretty good week.


Week 35, draw, paint, sketch, photograph, alter a face. In other words, do something to get a face on the page. No mention of stencil, but that is exactly what I used.....a very cool one from Artistcellar, which is actually a stencil and mask in one. I started out with a background which was created during a wonderful stencil workshop I took a couple of weeks ago with Michelle Ward. (Haven't blogged about it yet. Like I said before....poor neglected blog). It was the red rosin paper used to protect the table, and while cleaning up, I just had to cut out the section by my seat. This page started out completely covered with this paper. I placed the mask section on the right hand side and covered everything else with black paint. Then I used the stencil section to trace the smaller face on whatever was left of the paint smeared red rosin paper. It was cut out and glued to the left hand side of the page. Some faux stitching and writing with a white pen finished it off.


I know many of you signed up for the DLP. Are you still doing it? 


Monday, July 28, 2014

A Documented Life: Wish, Smash, Pocket

I'm a little behind in posting my prompt pages for The Documented Life Project.  Three weeks, to be exact.

Week 29: draw or collage your wishes. I had just read a magazine article (or a blog?) about using black gesso as a background, and thought it was a great idea. Speaking of wishes, I wish I could remember where I saw it, so I can credit the clever author. Anyway, this is what I did. The actual wishes, which I'd like to keep private, were done after I took the picture.


The doodling was done with Sharpie water based poster pens, souffle pens, and metallic markers.

Week 30: do a page in smashbook style. Easy for me, as I gave up on traditional scrapbooking ages ago, and have totally embraced the smashbook concept. This page is all about my week at CREATE, NJ.


Week 31: create a pocket for the week's ephemera. I either didn't do much, or didn't save many receipts, but there are a few. The pocket is thanks to my Envelope Punch Board. Pretty much everything was done with Gelli Plate print scraps.


I realized a while back that with all the tip-ins and embellishments that my book would soon outgrow its binding. This morning I took it apart and rebound it into two books, Jan-June and July-December. Since I didn't use a Moleskine planner, but a wire bound sketchbook,(and I own a Cinch binding machine) this wasn't difficult to do. I even found Gelli Plate prints in my stash for the covers that more or less go with the original book.


Tuesday, July 8, 2014

A Documented Life -- A Puzzle and A Tiny Shot

Week 27 in The Documented Life Project: use a puzzle in your work. All I could find at the time was a book of Sudokus, so I tore one out and glued it down. What followed was some gesso, ink, paint, embossing paste, stenciling, doodling, and a bit of text from the book.


The numbers in green were done by scraping white embossing paste through stencils. When dry, the stencil was put back over the numbers and then the green paint was dabbed on. I think you can see the texture in this close up.


The current week's prompt is to use a tiny photo in the piece. Coincidentally, the prompt came while Teri and I were helping Pat celebrate her birthday. We had a wonderful day (perfect weather, no big crowds thanks to many people being away for the July 4th weekend) at Fort Tryon Park in upper Manhattan. First we enjoyed brunch at The New Leaf Cafe, located right in the middle of the park. Then, a short walk over to The Cloisters, which is a branch of the Metropolitan Museum of Art. It is devoted to the art of medieval Europe, in a beautiful setting overlooking the mighty Hudson River. Instead of an "artsy" page, I did this one smashbook style, documenting a memorable day with fabulous friends.


It contains my own sketches (the arches, the bloody mary), tiny photos, and ephemera from the day (the map, the museum sticker). I think my favorite part of the page is the very small photo of Pat and I, which I carefully cut around our figures and superimposed over the sketch of the arches. It just makes me smile.

I generally share my DLP work as single pages, but here is how this one looks in the context of the entire book.


Friday, June 27, 2014

A Documented Life - Quote Worthy

The current prompt at The Documented Life Project is to incorporate a quote from the Bible (or a favorite book) into the work.


Words to live by, I think.

The background is (as usual), a Gelli Plate print on deli wrap paper, over which I did some stamping of grasses and flowers. The cornflowers(one of my favorite stamps, a VERY old one from Stampin' Up) were stamped with clear ink and embossed with Distress Embossing Powder.  The grass was also stamped with clear ink, but I used clear embossing powder there. I really like the contrast between the glossy embossing and the textured matte finish you get with the distress powders.


The lettering was done with a gold paint pen and outlined with a black Micron.

I often find myself wondering how I got along all those years without a Gelli Plate. 

Saturday, June 21, 2014

A Documented Life -- Have a Heart

Just hours from the reveal of the new prompt, I've finished my response to The Documented Life's week 25 challenge:  include a heart.

First on the to-do list, spend a happy afternoon making Gelli Plate prints on deli wrap paper, then cut some up into heart shapes.


Next, use another Gelli print for the background, then arrange the hearts on it. Add some doodling on the hearts and a heart stamp (on the right, by Dyan Reaveley) and a quote (written with Sharpie water based poster paint pens). 


The final touch, some machine zig zag stitching down the center of the hearts.


Monday, April 21, 2014

A Documented Life - Catching Up

Last week's prompt in The Documented Life Project was to use cardboard from a food container in a creative way.  Believe it or not, my page started out virtually covered with such cardboard.


I love how a project can start off one way and then just veer off in another direction, as though the work had a mind of its own. As I said, the background began covered with pieces from several different cardboard boxes. I went over the entire page with pink and green fluid acrylics, so much of the writing (but not all) showed through the paint. I used an old credit card, scraping the paint every which way. I liked the way that looked, but couldn't help but recall a technique from an Anne Bagby workshop. So I took the mask from a Dyan Reaveley stencil (I wish more stencil companies would also include the mask, or cut out portion along with the stencil), held it down with repositionable adhesive, and covered everything else with black paint. Although much of the background and cardboard is no longer visible, it is a dramatic look that I like a lot. You can see just a little bit of the word "light" on the head. With so much black, using paint markers, metallic markers, and souffle pens seemed like the thing to do.

The page is all about my recent commitment to a healthier lifestyle.

This week's prompt is to photograph or draw a picture of our favorite shoes. I've always loved shoes, but honestly, since retiring, I'm mainly in sneakers, but that doesn't mean I don't have some beauties hiding in the closet.


I LOVE these shoes. Too bad I can barely stand, let alone walk in them. But every now and again I take them out, put them on, and parade around the apartment for a second or two. Then I sit down and continue to admire them from that far more comfortable position.

The background is torn up pattern paper, glued down, muted a bit with off white paint, then dabbed with olive and brown ink. Stencils in those same colors were added. The shoes were sketched on watercolor paper and then painted. The stitching detail was added with a black pen. Then they were carefully cut out and glued onto the background page. At that point I decided to add more stenciling in red. The lettering on the top was originally white, outlined in black, but it seemed too stark, so I toned it down with a light pink marker.


Friday, April 18, 2014

Keys 4 Art 2014, Part III (DJ Pettitt is in the house!)

Ever since I discovered the wonderful world of art journaling, book binding, and mixed media, I have wanted to take a class with DJ Pettitt. I'd look at her glorious creations online and drool. Last year that dream came true in the form of a four day workshop DJ gave at Donna Downey's studio in North Carolina. I met Elena and Jacquie there, and we had such a great time, learned so much, and enjoyed DJ, both as an artist/teacher and human being. So much so, we wanted the rest of our art sisters to have the same experience. If you follow DJ (and if you don't, you should!), you know she is a passionate and talented photographer, especially of birds, and the lure of being able to get some shots of Florida wildlife was too much for her to resist. So, DJ Pettitt is in the house! We spent the next two days with DJ, and they were wonderful! And after our workshop was over, and we went on to other art projects, DJ spent her days out and about, going to bird sanctuaries and getting those photos she wanted. Check out DJ's blog (link highlighted above) to see what she saw.


DJ brought lots of her journals and some tote bags to inspire us.


DJ is a generous, patient teacher, and she spent as much time as was necessary with each of us.


Our books consisted of two signatures, with the pages connected by fabric "hinges." In this photo, DJ is watching as a template is used to mark the holes for binding. DJ has an amazing technique for book binding that is not only beautiful to look at, and results in a very sturdy book, but is easy to do. 


We created covers, entirely out of fabric, embellished them, and then did the same for the inside covers. We also did a wrap which went around our two signatures. The hinges I mentioned were temporarily held in place with a glue stick, then sewn in place on our machines. (Helpful tip from DJ: Use Elmer's Extra Strength glue stick. It will NOT gum up your machine needle.) Some machine stitching was also added, if we wanted, to the journal pages themselves. The following photos are all of my book. Not my usual color scheme, but these are the colors I was drawn to for this project. Considering our tropical setting, fitting, I think.


Here are some of the books my friends made.


Using DJ's binding technique, the buttons on the spine are not merely decorative; they help hold the whole thing together. Look at this beautiful lineup:


If you ever get the chance to take a class with DJ, run, don't walk, to sign up. And remember, you will only add 5 pounds to your luggage if you bring along a Janome mini sewing machine. Just trying to help.