Showing posts with label jewelry. Show all posts

Monday, October 27, 2014

Art Is You, 2014

Here I am, once again in shock that it has been over a month since I've posted. Don't have any reasons that make sense to me; I guess I just have to accept that like so many of my blogger friends, I'm just not a three times a week blogger any more. Or at the moment. But enough of that. I am here and ready to share a bit of my experiences at Art Is You, 2014, in Stamford Connecticut.

I love AIY; I've attended for the last three years, and this was definitely the best so far. I registered for five classes and I loved all five. I'm usually pleased with my choices, but there are often one or two classes I like less than the others. On the way home my friend and travelmate Cheryl asked me which was my favorite and I honestly couldn't answer. To borrow a phrase from The Last Crusade, I chose wisely.

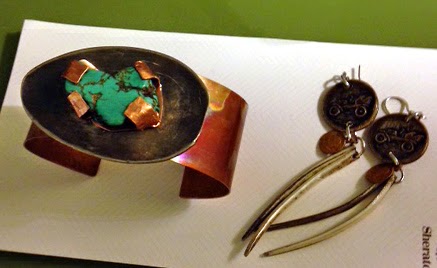
Day 1, Rethinking Dinner with the talented and fun Cheryl Strait. As promised, I will never look at dinnerware in the same way. We used spoons and forks to create jewelry, and I had a blast pounding, sawing, filing, drilling and torching.


 Cheryl was VERY generous with her time and her tools. I'd never used a jeweler's saw before, and it was easier than I thought it would be.


Our class kit consisted of what we'd need to make earrings and a bracelet or two.


I sawed off the handle of the spoon to use on the bracelet. The earrings feature the tines of the fork. The round pieces started as chunky buttons that I pounded the @*%! out of.

The next day I changed gears totally. The class was called Soft Sculpture Puppets with Lisa Lichtenfels. Ordinarily I have no interest in dolls or puppets, but I have always been fascinated by soft sculpture pieces and jumped at the chance to learn how it's done. Lisa is very famous in this world (I didn't know that when I signed up), and aside from being talented, she is a lovely human and an excellent teacher. Check out one of her sample pieces, Albert Einstein.


 Two other samples which demonstrated how to create an old and a young face.

Pretty amazing. Here is my sweet old-ish lady.


Lisa guided us through the process step by step. It certainly isn't easy, but it sure was fun.


We used pins....lots and lots of pins....and fiberfill to form the features. At this stage it is just plain frightening.


Once we began the sewing and removed the pins the heads looked much less creepy.


The addition of the puppet body and hair made all the difference. Now, I very much doubt I will be attempting this again, but just in case, our class kit included a DVD with every step explained in full.

Day 3 was Sacred Hearts with Lesley Venable. I was so looking forward to this class and it didn't disappoint. I got to solder all day! What's not to love?


Day 4, Gypsies, Tramps and Thieves with Andrea DeMeng. This was my second, and I'm sure not my last class with Andrea. I love her style, and her teaching is on point. She is so organized and her suggestions are spot on. We did fairly large collages and everyone did an outstanding job. Here is my....well, not a gypsy, no tramp, not a thief.....I believe what I have here is royalty.


The last day, Embedded Heart Shrine with Laurie Mika. My third class with Laurie. You think I like her? Nope. LOVE her! I know I can (and sometimes do) work with polymer clay at home on my own. But I just love her projects and the energy in her classrooms. 


 The coolest thing about the heart....it hangs on a hook in the niche and can be removed to wear as a pendant. Laurie even provided the chain for us to use.

One last thing about AIY, and another reason I feel this year was the best. Every attendee receives a handmade name tag (which is really like a little purse to hang around your neck, with room enough for a hotel key card). We were encouraged to make charms as a trade, and by the end of the week, the lanyard was completely covered with charms from art friends new and old. It's now hanging in my studio right above my computer, along with those from 2012 and 2013 to remind me always of wonderful times with my "tribe."


Many thanks to Sallianne McClelland & Ellen Legare, the extraordinary organizers of this event. They get us, and know how to create an environment that nurtures us. See you in 2015 ladies!


Thursday, April 25, 2013

Resin!

Last weekend I took a resin workshop with Isolina Perez at Michele's studio.  In addition to learning about and using three different kinds of resins, I got to spend a day with so many of my artsy friends.  What a treat!


Isolina provided everything we needed, and we started out using Ice Resin, since it has the longest setting/curing time.


I had to wait three days for this resin to cure, and then I was able to add some findings to create wearable art.  To turn the little charms containing Van Gogh's irises into earrings required some metal surgery, which I'm happy to say was successful.


Klay Resin is very cool stuff.  We used it to embed an image, which would later be part of a larger piece.  But you have to work very fast....curing time is about 7 minutes!  For the base the embedded image would sit on, we used copper, which we cut, filed, embossed, and patinaed. 


I really do love working with metal.  Here is my finished piece.


Crystal Clay is similar to Klay Resin in that it is also a two part clay that comes in colors.  However, it doesn't set for about an hour or so.  We created pendants using this resin with charms and bezels, stamped on it, and embedded crystals into it.  I made two pieces and when I got home, decided to combine them into one.


A few students had already left when this group photo was taken, but you can see how happy we all are.


I'm looking forward to Isolina's next class, and hope it is scheduled soon.   Make sure to check out all the offerings coming up at Michele's; there's bound to be something on the calendar you'll love.


Thursday, July 26, 2012

A Very Riveting Class

Still no computer, so posting from my phone. Better than nothing, but not great.

One of my favorite classes at CREATE was the jewelry class with Jean Van Brederode. We learned how to cut, texture, and shape the metal, and then many ways of connecting the pieces to form a cohesive design.

Jean was so generous with her supplies; we had an unbelievable amount of cool "stuff" to use.

I now know how to rivet, add patina, coil wire, make my own jump rings and my own hook and eye closures.

Here is my finished piece and some closeups.


Thursday, July 5, 2012

Pin It!

No, this is not a post about pinterest (although I've very recently started pinning and enjoy it a lot), but rather my response to the current Compendium of Curiosities 2 challenge.  Linda is giving us two weeks to work on a configurations project. All of the details you need to create one of your own can be found on pages 33 and 34 of C of C, Vol. 2.   You know, those boxes that Tim Holtz designed with many smaller boxes inside that can be used to create all sorts of things in the shadow box style.  I've made a few, as well as some printers trays (same idea, just shallower sections), and wanted to do something a little different.  Although the configurations pieces lend themselves to collections of memorabilia, they certainly can serve other purposes.  I had an idea percolating inside my head for some time, and Linda motivated me to finally put it into action.

Here's my piece.  Any guesses what it is to be used for?


C'mon, doesn't the post title give you a hint?   I have a huge collection of pins (that I mostly forget to wear), and I think they are too beautiful to keep tucked away all the time in jewelry boxes.  I've long wanted to have some way to display them but still be able to wear them if I want.  Enter the configurations box.

Admitedly, this project would have been easier to do with a configuration tray, but that's not what I had on hand.  First thing I'd need to do (well, not the first thing.  First I decorated the outside of the box with Tim's vintage subway sign paper.) was raise up the insides of the inner boxes, and at the same time have something to poke the pin backs into.  The solution, foam.  This is really easy.  Just use foam that is the correct depth, cut pieces slightly smaller than each inner box and wrap them in the fabric of your choice.  Gift wrap style.  You don't have to be  terribly neat in your cutting as the fabric hides all sins.  Put a glob of strong glue (I used Ailene's tacky glue) in the bottom of the box and stick the fabric wrapped foam inside. 

That's what I did.  If I had it to do over, I'd to the tissue tape part first.  It would have saved a little time, but it will work out either way.

The other thing I would  have done first was attach the decorative finial on top.  As it worked out I had to do a tiny bit of deconstruction to make the hole for the screw. 

It's helpful if you have some coordinating fabric, and I had this pack of different patterns within one color scheme by Moda:


So, here is what my finished piece looks like filled with just a few of my favorite pins.  The best part of all is that I can change out the pins whenever I want.  And I'll be able to enjoy them even if I forget to wear them.  Maybe if I see them on display I will put one on from time to time.


Looking at it makes me think it gives the expression "think outside the box" a whole different meaning, LOL.


Tuesday, June 26, 2012

Filling In The Blanks

Sorry 'bout that; sometimes the clever titles come easily, sometimes you just gotta push it.  So, today's post is all about Vintaj brass blanks.  They are pieces of brass, different sizes, different shapes, different finishes, just waiting to be altered in some way.  The metal is thick enough to be sturdy, but thin enough to take embossing and hole punching (if you have a cropodile or japanese screw punch).  Well, I'm pretty sure you could also bang a hole in them with hammer and nail, though I haven't tried that.  According to the Vintaj website, the blanks can also be cut with metal shears and filed.  For more information and a look at the whole line, click on the link above.

Vintaj recently partnered up with Sizzix to manufacture little embossing folders (they look very much like the Sizzlits; more on that later).  What is unique about them, is that they have different designs on each folder, so you get several different looks from each one.  

Vintaj also got together with Ranger, and now there are MANY bottles of patina to choose from, should you want to totally alter the look of the metal.  And a sealer too, to make your colors permanent.

I've had some of the blanks, two embossing folders, and a handful of patinas for quite some time, and this past weekend I finally got around to experimenting with them.  First I made these dangly earrings.


Too much glare to really make out the design, but I used the folder with the leaves and ferns and isolted the area I wanted on my blanks.  Then I used my japanese screw punch to make an extra hole in the circles so that the little rectangles could be attached.  As for the patina....well, there are many layers and I used lots of colors.  You can apply one color at a time with a paintbrush, or several (the way you would alcohol inks), which I did, dabbing them onto the metal with a foam sponge.  The predominant color though, is verdigris. 

I wanted to see if I could use my Sizzlits, as I have a few of those.  The answer, yes and no.  I tried.  I got an impression, but I won't be doing it again.  The Sizzlit seems a tiny bit bent and the blank is also a little less than flat.  I just have a feeling that using one again and again with the metal will end in disaster.  Also, the Sizzlits aren't designed the same way; most are just one larger image or scattered smaller ones, and don't work well with the sizes of the blanks.  I have one of a dotted heart, and when I used it on the necklace I made (next photo) only the dots showed up.  The overall heart was too large, and the round blank I used just nestled inside it.  Not a problem; I like the dots, but that is just an example of the design differences between these two (at first glance identical) Sizzix products.


For this one, I punched three extra holes on the bottom to attach the charms and the key.  All were colored with verdigris, moss, jade, and onyx (that would be black) patinas, with just a touch of ochre.  Easy peasy, and a great way to unify metals that you might not normally put together.  And it's a totally different look than what you get with alcohol inks, so I consider these products to be a good addition to my (ever growing) stash.


Thursday, May 31, 2012

Cuffed!

I have to admit to being a bit of an art slut.  As soon as I see an interesting project, I just have to go for it.  That's what happened recently when I saw my friend Teri's beaded cuff bracelet.  As soon as I got home I started ordering supplies.  They all arrived this week and I got to beading.  I didn't have to order any seed beads as I already have a stash of those.  Big surprise.  But I did get to spend a pleasant hour or two choosing some cabachons.  I ordered the brass bracelet blank, the material you actually do the beading on, the lining, the thread and the needles HERE.  They also have some very clear written directions, which were very helpful.  I got the cabachons HERE.

Teri was working from a book by Sherry Serafini, which, believe it or not, I do not own, but between seeing Teri's bracelet in person and reading some directions online I got the general idea. 


This is NOT difficult, but it is time consuming, and working with small beads and a very thin needle requires good lighting, so there was no 2:00am beading going on.  I'd work on it for an hour or so, go off to do something else, then pick it up again when I felt like it. 

You know I like to share my observations, so if this is something you'd like to try, I do have some thoughts that might help you.

You can't have too many needles and you MUST have a needle threader.  Working with these seed beads requires a #12 needle, which is very thin, very sharp, and easily bent.  I ordered a pack of 6 needles and went through 4 of them.

To have a really finished looking piece on the underside, I see now that having the lining (I used ultra suede) and the thread color match would have been much better.  But when I placed my order, the black ultrasuede I really wanted was out of stock, and being impatient (and an art slut) I just ordered what they had, which was grey.  I'd just as soon not have those black stitches visible, but it's hardly the end of the world. 

I have plenty of bracelet blanks so this won't be my last bracelet, but right now I'm thinking of ways to use this technique to make some bold dangly earrings.  Stay tuned.....