Showing posts with label polymer clay. Show all posts

Monday, October 27, 2014

Art Is You, 2014

Here I am, once again in shock that it has been over a month since I've posted. Don't have any reasons that make sense to me; I guess I just have to accept that like so many of my blogger friends, I'm just not a three times a week blogger any more. Or at the moment. But enough of that. I am here and ready to share a bit of my experiences at Art Is You, 2014, in Stamford Connecticut.

I love AIY; I've attended for the last three years, and this was definitely the best so far. I registered for five classes and I loved all five. I'm usually pleased with my choices, but there are often one or two classes I like less than the others. On the way home my friend and travelmate Cheryl asked me which was my favorite and I honestly couldn't answer. To borrow a phrase from The Last Crusade, I chose wisely.

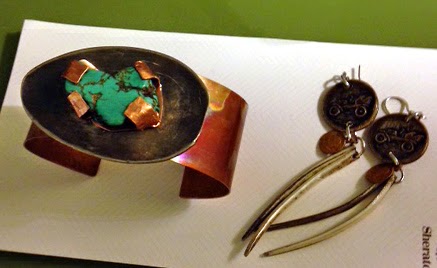
Day 1, Rethinking Dinner with the talented and fun Cheryl Strait. As promised, I will never look at dinnerware in the same way. We used spoons and forks to create jewelry, and I had a blast pounding, sawing, filing, drilling and torching.


 Cheryl was VERY generous with her time and her tools. I'd never used a jeweler's saw before, and it was easier than I thought it would be.


Our class kit consisted of what we'd need to make earrings and a bracelet or two.


I sawed off the handle of the spoon to use on the bracelet. The earrings feature the tines of the fork. The round pieces started as chunky buttons that I pounded the @*%! out of.
The next day I changed gears totally. The class was called Soft Sculpture Puppets with Lisa Lichtenfels. Ordinarily I have no interest in dolls or puppets, but I have always been fascinated by soft sculpture pieces and jumped at the chance to learn how it's done. Lisa is very famous in this world (I didn't know that when I signed up), and aside from being talented, she is a lovely human and an excellent teacher. Check out one of her sample pieces, Albert Einstein.


 Two other samples which demonstrated how to create an old and a young face.

Pretty amazing. Here is my sweet old-ish lady.


Lisa guided us through the process step by step. It certainly isn't easy, but it sure was fun.


We used pins....lots and lots of pins....and fiberfill to form the features. At this stage it is just plain frightening.


Once we began the sewing and removed the pins the heads looked much less creepy.


The addition of the puppet body and hair made all the difference. Now, I very much doubt I will be attempting this again, but just in case, our class kit included a DVD with every step explained in full.

Day 3 was Sacred Hearts with Lesley Venable. I was so looking forward to this class and it didn't disappoint. I got to solder all day! What's not to love?


Day 4, Gypsies, Tramps and Thieves with Andrea DeMeng. This was my second, and I'm sure not my last class with Andrea. I love her style, and her teaching is on point. She is so organized and her suggestions are spot on. We did fairly large collages and everyone did an outstanding job. Here is my....well, not a gypsy, no tramp, not a thief.....I believe what I have here is royalty.


The last day, Embedded Heart Shrine with Laurie Mika. My third class with Laurie. You think I like her? Nope. LOVE her! I know I can (and sometimes do) work with polymer clay at home on my own. But I just love her projects and the energy in her classrooms. 


 The coolest thing about the heart....it hangs on a hook in the niche and can be removed to wear as a pendant. Laurie even provided the chain for us to use.

One last thing about AIY, and another reason I feel this year was the best. Every attendee receives a handmade name tag (which is really like a little purse to hang around your neck, with room enough for a hotel key card). We were encouraged to make charms as a trade, and by the end of the week, the lanyard was completely covered with charms from art friends new and old. It's now hanging in my studio right above my computer, along with those from 2012 and 2013 to remind me always of wonderful times with my "tribe."


Many thanks to Sallianne McClelland & Ellen Legare, the extraordinary organizers of this event. They get us, and know how to create an environment that nurtures us. See you in 2015 ladies!


Sunday, June 22, 2014

Fanciful Creatures

Last weekend I was lucky enough to attend a polymer clay workshop with Doreen Kassel (not my first class with Doreen, and hopefully not my last!), who is a wonderful artist and teacher. The class was in a new space (for me), and sponsored by my friend Michele's Little Bird Creations. In the past I've made bird ornaments with Doreen, and a charming long legged mouse. This time we were working in miniature, making small pieces that can be used as pendants, pins, or even refrigerator magnets.


Above, Doreen (in the foreground) demonstrating. That's Michele in the back. You can see a lineup of samples on Doreen's table, to give you an idea of the size. I'd say most are about 1 1/2".

Doreen helped me do a giraffe, and here are some of the step-by-step photos.


I also did an owl in this format. We added crowns because.....well, why not?


After baking, we applied a wash of brown.


Followed by color.


Doreen also gave us pendant blanks, and guided us in the creation of a sweet little pig:


Here are all three including some profile shots to show you just how dimensional they are.


Michele is having Doreen back in the fall, and if you want to have a great artsy day, join Michele's Meetup group and you'll be notified when you can register for the class. You'll love it!


                   Doreen's Blog

                   Doreen's Facebook Page


Sunday, April 7, 2013

Skinny Legs and All

One of my favorite art experiences of 2012 was attending Art Is You in Connecticut.  And one of my favorite classes there was Sculptural Birds and Beasts Ornaments with Doreen Kassel.  Click HERE to see that post. So when I saw that Doreen was coming to Michele's studio, I signed up immediately.

Yesterday Heidi, Pat and I went downtown and had such a fun day with Michele, Doreen, and four other students, working with polymer clay, and enjoying each other's company.  And many thanks to Heidi's hubby Marty for providing door to door transportation.....both ways!

 
Doreen teaching and demonstrating:


In this class we made sculptural creatures with long skinny legs.....much more detailed than the birds I made at Art Is You.  Here are some of Doreen's spectacular skinny leg pieces (photo from Doreen's site):


After conditioning the white polymer clay we ran it through a pasta machine to make very thin sheets, and used them to cover a ball (some of us used glass ornaments, some used papier mache spheres, and some {like me} used compressed paper balls that Doreen gets from France).


Then comes the fun (and challenging) part: deciding what to make and then adding clay to the covered ball to create the features.  The skinny legs were formed from lollipop sticks which were also covered with the clay.  For the arms we used 14 gauge aluminum wire (again, covered with the clay).
I decided to do a mouse.


OK, it doesn't look much like a mouse yet.  But wait.....
 
After a half hour or so in the convection oven, my mouse is ready for paint.


Doreen showed us how to make ruffles, puffy sleeves, outsized shoes, and anything else we wanted to add to our creations.  Pat also decided on a mouse, while Heidi did a Pomeranian.  Doreen is so helpful with any problems that come up, and if someone wants to do a creature she doesn't have a sample for (like Heidi's Pom), she will work with that person.  Heidi had never worked with polymer clay before, and her clay Pom looks just like Hunter, the real deal.

Here is Heidi's finished piece, followed by Pat's:


After painting (we used oil paints) and any necessary repairs or additions, the pieces go back into the oven to cure. 


The paint on my mouse was still too wet to allow me to handle it, so I waited until I got home to take pictures of my finished piece.  Well, almost finished.  Those bare legs will definitely get the striped stockings treatment.....just as soon as the white paint dries.


Can you guess what the crown is?


I won't keep you in suspense.  It's the top part of a Christmas ornament.  Doreen uses so many ornaments in her work, and since not all her pieces are meant to be hung, she always has leftover tops.  Clever woman realized they make the perfect crown.


I think my royal mouse has mastered that Queen Elizabeth waving-to-the-masses look.


Thursday, October 11, 2012

Two Birds and a Shrine

My Adventures With Polymer Clay
 
Two of the classes I took at Art Is You involved working with polymer clay.  While I am not exactly a polymer clay virgin, I'm also no expert.  Things I learned:  well conditioned clay is a must, as is an oven that keeps accurate temperatures.
 
First up, Mini Shadow Box Shrine with Laurie Mika.  Wonderful class, great teacher, and my fellow students were so very talented.  Laurie provided the shrine (a nicely deep shadow box), very clear and in depth instruction, stamps for texturizing, mica powders and paints for color, and we only had to show up with pre-conditioned clay, some basic clay tools, and assorted doo dads (optional) to use as decoration (if we wished....remember the word optional).
 
Here is what my shrine looked like at the end of class.  I couldn't decide what to place inside the shrine, so I waited until I got home for that step.  Everything except the costume jewelry on the top is clay.

 
At home I added some decorative paper to the back (the white part you see showing above), then built it up a bit with cork and attached a pin.  I may change that, but I wanted to see how it looked completed.  Fortunately, I can open the back and do whatever I want to the inside.
 
 The little triangles on top and bottom were supposed to be clay tiles, but I didn't measure them well, and they didn't fit.  At home I filled those spaces with rust colored micro beads.


 An angled view so you can see the depth of the shadow box.  The outside was painted then stamped with permanent black ink.


This is a close up of the top of the shrine so you can see those micro beads.
 
Here is Laurie discussing what each of us created.  Most of us finished our pieces, or came close to it; others left with a work in progress.  Finished or not, I think they all are awesome.
 
 
Check them out!


Two words I seldom use are delightful and whimsical, but both aptly describe my second polymer clay class, Sculpural Birds and Beasts Ornaments with Doreen Kassel.  The second I saw the illustrations that accompanied the description of the class I was hooked.  It was the first class I registered for.
 
We took plain glass ornaments and covered them with a thin layer of clay.  Then, with Doreen's assistance we added clay to form the features of our animals.  I stuck to the birds, but there was a dog, a cat, a cow, and even the man in the moon.  Here are some of the samples Doreen brought in.  One is more impressive than the next.  She is an inspiring teacher.


Here are my two guys, a bluebird and an owl, followed by a closer look at the owl.  After baking, we colored the creatures with oil paint, which results in the most beautiful kind of glowing effect.


A few more owls, done by my classmates.


My friend Pat working on her man in the moon.  You can see her completed owl on the table.


Next up, more metal!