Monday, October 27, 2014

Art Is You, 2014

Here I am, once again in shock that it has been over a month since I've posted. Don't have any reasons that make sense to me; I guess I just have to accept that like so many of my blogger friends, I'm just not a three times a week blogger any more. Or at the moment. But enough of that. I am here and ready to share a bit of my experiences at Art Is You, 2014, in Stamford Connecticut.

I love AIY; I've attended for the last three years, and this was definitely the best so far. I registered for five classes and I loved all five. I'm usually pleased with my choices, but there are often one or two classes I like less than the others. On the way home my friend and travelmate Cheryl asked me which was my favorite and I honestly couldn't answer. To borrow a phrase from The Last Crusade, I chose wisely.

Day 1, Rethinking Dinner with the talented and fun Cheryl Strait. As promised, I will never look at dinnerware in the same way. We used spoons and forks to create jewelry, and I had a blast pounding, sawing, filing, drilling and torching.


 Cheryl was VERY generous with her time and her tools. I'd never used a jeweler's saw before, and it was easier than I thought it would be.


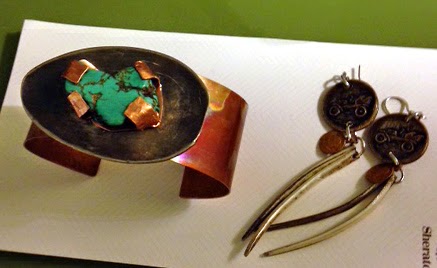
Our class kit consisted of what we'd need to make earrings and a bracelet or two.


I sawed off the handle of the spoon to use on the bracelet. The earrings feature the tines of the fork. The round pieces started as chunky buttons that I pounded the @*%! out of.

The next day I changed gears totally. The class was called Soft Sculpture Puppets with Lisa Lichtenfels. Ordinarily I have no interest in dolls or puppets, but I have always been fascinated by soft sculpture pieces and jumped at the chance to learn how it's done. Lisa is very famous in this world (I didn't know that when I signed up), and aside from being talented, she is a lovely human and an excellent teacher. Check out one of her sample pieces, Albert Einstein.


 Two other samples which demonstrated how to create an old and a young face.

Pretty amazing. Here is my sweet old-ish lady.


Lisa guided us through the process step by step. It certainly isn't easy, but it sure was fun.


We used pins....lots and lots of pins....and fiberfill to form the features. At this stage it is just plain frightening.


Once we began the sewing and removed the pins the heads looked much less creepy.


The addition of the puppet body and hair made all the difference. Now, I very much doubt I will be attempting this again, but just in case, our class kit included a DVD with every step explained in full.

Day 3 was Sacred Hearts with Lesley Venable. I was so looking forward to this class and it didn't disappoint. I got to solder all day! What's not to love?


Day 4, Gypsies, Tramps and Thieves with Andrea DeMeng. This was my second, and I'm sure not my last class with Andrea. I love her style, and her teaching is on point. She is so organized and her suggestions are spot on. We did fairly large collages and everyone did an outstanding job. Here is my....well, not a gypsy, no tramp, not a thief.....I believe what I have here is royalty.


The last day, Embedded Heart Shrine with Laurie Mika. My third class with Laurie. You think I like her? Nope. LOVE her! I know I can (and sometimes do) work with polymer clay at home on my own. But I just love her projects and the energy in her classrooms. 


 The coolest thing about the heart....it hangs on a hook in the niche and can be removed to wear as a pendant. Laurie even provided the chain for us to use.

One last thing about AIY, and another reason I feel this year was the best. Every attendee receives a handmade name tag (which is really like a little purse to hang around your neck, with room enough for a hotel key card). We were encouraged to make charms as a trade, and by the end of the week, the lanyard was completely covered with charms from art friends new and old. It's now hanging in my studio right above my computer, along with those from 2012 and 2013 to remind me always of wonderful times with my "tribe."


Many thanks to Sallianne McClelland & Ellen Legare, the extraordinary organizers of this event. They get us, and know how to create an environment that nurtures us. See you in 2015 ladies!


Saturday, September 20, 2014

Another Sewing Project

Last month my pals Cheryl, Pat, and Marsha trekked with me to Brenna's lovely home a little ways north of me for a fabulous afternoon of learning what Brenna knew about Shibori dying. It involves folding, twisting, tying, sewing, and clipping fabric in various ways. Brenna didn't have the traditionally used indigo, but we dyed lots of fabric with good old Rit dye. What to do with all that beautifully colored cloth......

I decided to make an apron. It just seemed like the best use of the fabric even though a) I seldom actually remember to put on an apron and b) if the project turned out well, I doubted I'd want to dirty said apron. But I proceded anyway.

It all got solidified when I was watching a PBS station and saw a quilting technique that looked super easy. The teacher was none other than Donna Dewberry, who rose to fame and fortune with her techniques for painting with acrylics. I had no idea she also quilted. I also have no idea if her method is the usual way to crazy quilt or something of her own design. All I can tell you is that the only skills involved are the ability to fold a piece of fabric in half and sew in a (relatively) straight line. If you're curious, I suggest a Google search, as seeing Donna demonstrate is much better than me trying to explain it.

The skirt of the apron is a little shorter than I would have liked, but I ran out of fabric. the binding, the piece that goes around the neck, and the apron ties were sewn from some batik fabric I already had, but everything on the skirt and the flower embellishment on the top was done with the Shibori dyed fabric. Thanks, Brenna!


Other details: The top is plain lightweight canvas (or maybe it's called duck cloth??), which I colored with fluid acrylics and then used a Jessica Sporn stencil (from Stencil Girl) for a tone on tone look. I printed "art saves lives" with my favorite alphabet stamp set (a VERY old discontinued Tim Holtz set, by Junkitz), using permanent ink.


I recently discovered that my good old (and cheap) sewing machine came with a free motion foot and a plastic thingamabob to cover the feed dogs. Hence, my free motion stitching on the skirt. And by free, I mean random and haphazard and not following any sort of pattern.


I didn't use any pattern for the apron; I just looked at the aprons I own and more or less followed the shape of each piece. It took me a couple of days, was a lot of fun, but would I do it again? Probably not. But I sure might incorporate some of the skills involved in making journal covers, pillows, a tote bag.....who knows what else. 


Monday, September 1, 2014

A Documented Life -- What's Black and White?

The latest prompt in The Documented Life Project, that's what. And it coincided with the very happy rediscovery of my favorite hand carved stamps that went missing sometime in April.


They are very simple,  but can be used in so many ways, singly or in combination, depending on their orientation.


I stamped several sheets of white paper, using an india ink stamp pad, then cut the pages into 1" strips.


The strips were then cut into 1" squares.


I played around with their placement, and finally settled on the above design.


The silhouette was done with a Dyan Reaveley stencil (by Ranger) in black acrylic paint. One of the things I like most about silhouette stencils, as opposed to stamps,  is that you can use it on either side, so your silhouette can face in the direction you want.


I finished it off with an outline of white machine stitching. I'm toying with the idea of adding one pop of color, maybe a red hat, but haven't made up my mind. 


Thursday, August 28, 2014

A Documented Life - 4 Weeks in a Flash

While I've been keeping up with my Documented Life Project prompts, I've been neglecting this blog. So, here we go, the last four weeks in a flash......

Week 32, use a fortune cookie. I know I have an envelope of them somewhere, but couldn't find it, so faked it with a download. My total inspiration for this was a workshop given by DLP administrator Roben-Marie Smith. I used the insides of security envelopes and gelli print scraps, and a whole lot of doodling.


Week 33, use the underpaper (you know, the paper under your work that collects all the inks, paints and sprays). In my case, the underpaper is the deli wrap paper I used to blot off excess paint on my gelli prints. Over top, some stamping, lettering, doodling, and stitching.


Week 34, use numbers in some way to indicate how the week went. This one really speaks for itself. All in all, a pretty good week.


Week 35, draw, paint, sketch, photograph, alter a face. In other words, do something to get a face on the page. No mention of stencil, but that is exactly what I used.....a very cool one from Artistcellar, which is actually a stencil and mask in one. I started out with a background which was created during a wonderful stencil workshop I took a couple of weeks ago with Michelle Ward. (Haven't blogged about it yet. Like I said before....poor neglected blog). It was the red rosin paper used to protect the table, and while cleaning up, I just had to cut out the section by my seat. This page started out completely covered with this paper. I placed the mask section on the right hand side and covered everything else with black paint. Then I used the stencil section to trace the smaller face on whatever was left of the paint smeared red rosin paper. It was cut out and glued to the left hand side of the page. Some faux stitching and writing with a white pen finished it off.


I know many of you signed up for the DLP. Are you still doing it? 


Saturday, August 23, 2014

A Very Happy Mailbox.....

....is a mailbox full of mail art. In case you don't know, mail art is a decorated envelope, package or postcard, the point being that the container is the art, and there may or may not be anything inside. For the past few years, one of my groups, Blissfully Art Journaling (this links to the yahoo group, and we also have a Facebook page) has had a mail art swap going on during the summer months. Everyone who signed up had about two months to send mail art to everyone else on the list. I recently received my last piece, and decided it was time to do something with it all. Not to mention the nearly 30 pieces I received last year and still had languishing in a folder. Not to mention also, all the random mail art I've gotten from various friends over the years.

My inspiration for creating my mail art journal came from two sources. One, a workshop by one of the Documented Life Project administrators, Roben-Marie Smith. Click HERE to learn more about it. It spurred me on to get all this yummy mail into a book, and was well worth the cost. I used one of Roben-Marie's techniques for getting all my mail onto pages, but my binding method came out of classes I've taken with the wonderful DJ Pettitt

The outside of my book:


.
Just about everything I used to decorate the covers came from my art pals....bits of ephemera, text papers, random scraps, stamped images....all included inside the envelopes.

Inside, you can see how I was able to attach multiple envelopes and postcards on each page by stacking them and using my sewing machine to stitch them in place. I love that each piece can be turned, as often the backs are just as beautiful as the fronts.


The pages are hinged together with strips of fabric that I printed with my Gelli Plate.


Here are just a few of the pages:


The buttons on the spine are not merely decorative. They are what hold the signatures in place. Thank you for this awesome technique, DJ!!


For my fellow mail art lovers, I hope this inspires you to get your mail art out of the closet and into a book.


Monday, July 28, 2014

A Documented Life: Wish, Smash, Pocket

I'm a little behind in posting my prompt pages for The Documented Life Project.  Three weeks, to be exact.

Week 29: draw or collage your wishes. I had just read a magazine article (or a blog?) about using black gesso as a background, and thought it was a great idea. Speaking of wishes, I wish I could remember where I saw it, so I can credit the clever author. Anyway, this is what I did. The actual wishes, which I'd like to keep private, were done after I took the picture.


The doodling was done with Sharpie water based poster pens, souffle pens, and metallic markers.

Week 30: do a page in smashbook style. Easy for me, as I gave up on traditional scrapbooking ages ago, and have totally embraced the smashbook concept. This page is all about my week at CREATE, NJ.


Week 31: create a pocket for the week's ephemera. I either didn't do much, or didn't save many receipts, but there are a few. The pocket is thanks to my Envelope Punch Board. Pretty much everything was done with Gelli Plate print scraps.


I realized a while back that with all the tip-ins and embellishments that my book would soon outgrow its binding. This morning I took it apart and rebound it into two books, Jan-June and July-December. Since I didn't use a Moleskine planner, but a wire bound sketchbook,(and I own a Cinch binding machine) this wasn't difficult to do. I even found Gelli Plate prints in my stash for the covers that more or less go with the original book.


Thursday, July 24, 2014

CREATE!!

Not a command (though you really should go and create something today), but the name of the retreat I attended two weeks ago in Somerset, NJ. This was my third time and by far the best. I had many issues with the hotel in the past, but they seem to have been much better staffed this year. Last year the event coincided with one of the worst heat waves we ever had, and some of the rooms had air conditioning problems. This year the weather was mild. All in all, a good experience.

Generally, when attending a four or five day retreat, taking 4 or more classes, there is a good chance you won't be equally thrilled with them all. This time, for me, was the exception. I chose wisely, it seems, and loved each and every class I took.

First up, "Roll With It," a technique-driven class with the wonderful Michelle Ward. We each worked on a 25 foot long roll of 12" wide paper. Michelle would demo a technique, we'd run back to our seats, execute it, and then surround her again for the next technique. At the end, we folded up our roll accordian style and bound it into a book. While I love a nice finished product as much as the next person, I really appreciate a class that teaches me things I can use in my own art. A winner!


Some rolls in progress.


Before folding, we took a group shot over the balcony of the hotel. And attracted quite a bit of attention in the process. I'm the one in the yellow smock on the right side of the balcony, with my mainly green roll in front of me.


Some pages from my book.


The next day was "Threads and Letters: Art In Free Motion" with Joanne Sharpe. LOVED the opportunity to work on a Bernina sewing machine. In free motion sewing you can go in any direction without stopping or lifting the foot. Took some getting used to, but what a great, liberating feeling. We did mini quilts, two layers of muslin with batting in the middle. I did two city scapes. After sewing, we colored with markers, pencils, water color crayons, and paint. This is what one looks like before trimming and adding color.


Here are some of Joanne's gorgeous samples for the class:


Group photo. I'm the last one in the first row.


Joanne snapped this one of me and Cheryl, and caught me with a paint brush in my mouth. Hey, I only have two hands.


Look who else took the class! My old pal Stephanie from the Tim Holtz cruises!


I only got to paint one of my quilts in class, and when I got home I finished it off with some batik fabric binding. I'll get to the other one.....someday.


My third class was "Handmade Hamsas and Hearts," a polymer clay workshop with Laurie Mika


We worked with colored clay and added some sparkle with Pearl X and Rub N Buff. We made some of the embellishments with clay and others we brought along from our stashes of charms, old jewelry, found objects, etc.

In this photo, nothing has been baked or attached. I'm just trying things out in different positions.


And here is the finished piece, which is already hanging in my home. I love it!


My last class was "4-Color Block Printing" with Jane Davila. Jane has devised a creative way to make prints without a press, and without any toxic chemicals. She also showed us how to cut our own mats. There is a definite learning curve with this. How much paint to use? How hard to press? This print is far from perfect, but I know this is a technique I'll be trying again on my own, and I'm sure things will get better. I'm sorry I didn't think to take any photos of Jane's work, because it is fabulous. 


In what has become a tradition, Cheryl and I left early Monday afternoon and stopped for lunch at Joe's Crab Shack before heading home. This time, we had Brenna with us. A perfect way to finish a wonderful week of art and friends.