Showing posts with label glossy accents. Show all posts

Sunday, March 31, 2013

Metal Etching

I recently heard about a new Meetup group right here in my hood.  Not something that happens every day; I generally have to do some commuting to get to a class.  Furthermore, the class being offered was to be given by Jen Crossley, a wonderful Australian artist, and the samples shown on the site just blew me away.  Oh, and  by the way, the group is called Art Carnival, and the leader (or ringmaster, as she puts it) is Cindy Dean. 

If all this wasn't enough, several of my regular art class buddies were also in attendance, and I met a few new ones.  A really great group, held in a lovely apartment, and we were also VERY WELL FED.  Could anyone ask for more?

We cut metal, we stamped on it with permanent ink, we submerged the metal in etching solution, we added patina, we punched holes and inserted eyelets, and voila!  Two covers were created.  Then we cut the paper we had brought, folded it and made signatures, and learned how to put the book together with an exposed spine using a coptic stitch.  Lots and lots of charms and other do-dads were added, and this is what my book looks like.


Many of the charms I've acquired over the years in swaps or as gifts.  Some I made.  Some were bought.  I don't find charm bracelets or necklaces to be particularly comfortable to wear, so this use of the charms really pleases me.
 
The only thing I did not complete in class was the addition of the framed photo on the front.  (Cindy and Jen had already very graciously allowed the class to go well over the published end time, so that everyone was able to leave with a put together book).  When I got home, I looked through my stash, found the metal frame I used, distressed it a bit with ink and paint, and inserted the photo of my parents when they were very young....a full year before I was born.  I wanted to cover the photo with some mica but all I got for my troubles when I tried to cut it was a table full of mica shards.  This is my faux mica solution:  I covered the photo (which was already in the frame) with Ranger's Glossy Accents, and then smooshed a piece of very thin acetate (cut to fit exactly) over the photo.  Somehow the smooshing created the irregular look of mica.  At least in my mind it did. 


I'm trying to figure out some sort of closure, but until that happens, I jazzed up a binder clip with paint and ink and that keeps the book closed.


Sunday, August 5, 2012

Chunky ATC, Wendified

NOTE: I thought I had found a way to insert the photos after each description, but it seems that mobile blogger has outwitted me again. Sigh. Sorry to give you another Sunday puzzle.

I signed up for another chunky ATC swap, this one in the Wendy Vecchi yahoo group. (http://groups.yahoo.com/group/everythingwendyvecchi)
I was assigned the very talented Anita Houston to receive mine, so I went over to her blog to get some inspiration. I was intrigued by her tutorial for perfect pearls faux leather and used it for the backgrounds on the two largest surfaces. It's wonderful!

Check out the tutorial: http://theartfulmaven.blogspot.com/2012/07/faux-leather-video-tutorial.html

Here are those two sides. Lots of Wendy's art parts, all inked with the spring and summer distress inks, and each stamped with a different Wendy background stamp.

Next, the two sides, covered with embossed copper.

The top (Wendy's flowers and leaves on grungepaper), the bottom, showing half pearls for feet, and some close ups.


Sunday, July 15, 2012

Getting Chunky

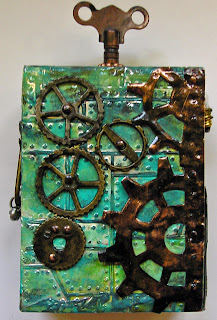
No, this is NOT a post about diet gone wrong.  It's about a chunky ATC.  If you don't know what that is, it's an ATC made of wood, and it is very dimensional and has not one, but SIX sides to decorate.  The "face" is the standard ATC size of 2 1/2" x 3 1/2", and the depth is 1 1/2", so there are many opportunities to embellish to your heart's content.

I completed mine a while back for a swap in my Kindred Souls group,  and just found out that I'm to send it to my great friend Elena, which is a relief, because the theme I chose, steampunk, is one I know she'll like.  So, Elena, you know the drill....if you'd like to be surprised, look no further!


I began by embossing two of Ranger's foil tape sheets with Tim's industrial look folders: diamond plate and riveted metal.  What's great about the tape is that it has a strong adhesive backing, so adhering it to the wood was easy.  Then I went crazy with the Ranger/Vintaj patinas I have come to love so much.  And then.....the real fun began.....finding just the right steampunkish elements to add to the piece.


Some gears and sprockets from Tim's idea-ology collection, including the newish mini gears, which I just love.  The focal image is from a stamp in his steampunk set.  I cut it and inserted it into whatever that doodad is (a 7 Gypsies doodad), filled the top with glossy accents, and surrounded it with some copper colored ball chain.  On the bottom, also cut from the foil sheet, a bit from Tim's washer border decorative strip.  The sentiment is also Tim...one of the word bands all patinaed (word???) up.

Here's a closer look of the main image:


On the flip side:


More gears, some from 7 Gypsies, and one I'm not sure of.  On the right edge, I used Tim's steampunk on the edge die to cut some real copper sheeting that my darling brother found and presented to me recently.  It's important to train all your non crafty friends and relatives so they know just what sort of junk will make your heart go pitter patter.  When I saw all the copper he'd found I definitely was on the verge of needing CPR.  It too, was altered a bit with the patinas.

Now, for the "sides" of the ATC:


The fellow with the camera is a Wendy Vecchi stamp, colored with distress markers, and enhanced with some glossy accents and a black glaze pen.  Behind him, some more of that washer border, and on top of that, a tiny lightbulb from my stash.  Here is a closer look of how I attached the bulb....wire and tiny copper nails (also courtesy of my bro).  Those nails appear all over this ATC!


Next side:


This side has a strip of metal, attached with more of those copper nails, and over top a piece of idea-ology with some scrap chain attached.

The top:


If you're wondering how I attached the watch key (so it would stay attached), this is what I did.  I first screwed it into the round piece of metal and then attached that metal to the top with a combination of strong glue and more copper nails.  I added the copper ball chain to finish it off.

No photo of the bottom.  Except for the metal it remains unadorned so that the piece will stand up nicely.  But I'm thinking of adding some little feet, if I can find just the right items to use for that purpose.

If you'd like to try your hand at a chunky ATC, all you need is a two by four from the lumber yard.  For some reason unknown to me (maybe it's a guy thing), the actual measurement of a two by four is
1 1/2 by 3 1/2".  So, all you need to do is make cuts on it every 2 1/2" and you have the exact right measurements for a chunky ATC!  Pretty cool, huh?


Thursday, March 1, 2012

So Many Challenges, So Little Time

I'm back from a blissful week cruising the Caribbean; I feel invigorated, but still haven't figured out how to squeeze an extra hour or two into the day.  So, when I get the opportunity to create something that can be used for more than one of my favorite challenges, I do jump at the chance.

Here's the rundown:    Grungy Monday 37 calls for wearable art
                                     Simon Says Stamp and Show.....idea-ology
                                     Tim's March edition of the 12 Tags of 2012 features a beautiful mosaic
                                          technique

Tim used his butterfly movers and shapers to create the mosaic; I went for the tattered florals.  He used Ranger's cement embossing powder from the Antiquities line; I used their ancient gold.  And I have a surprise.....the flowers on my tag are actually a pin that can be removed and worn.  My flowers are embellished with some idea-ology that has been colored with distress embossing powder (I used scattered straw, shabby shutters and worn lipstick), so I'm covered for all three challenges.  Wearable art, check.  Idea-ology, check.  Mosaic technique, check. 

Without further blah blah blah, here is my tag:


My background is a gorgeous Hero Arts stamp, lightly inked with tea dye distress ink.  Some antique linen was sponged on afterwards, followed by a spritz of pewter perfect pearls mist.  I wanted a very subtle background so that my pin would pop.

The sentiment is a Wendy Vecchi stamp and the stick pins are from Maya Road.  And here is a closer look at the pin.


Tip:  if you're trying the mosaic technique on very small shapes (like the smallest of the flowers), and therefore using very small bits of paper, you might find it a little difficult to precisely place the glossy accents on the paper only, and not the heat set embossing powder.  I just squeezed a blob of it on my craft sheet and used a small brush.  I didn't exactly brush it on; it was more like a gentle dabbing, but it got the glossy accents exactly where I wanted it, and it self leveled nicely.  BTW, I used a tie tack finding  to make the pin, and all three flowers were glued together with matte multi medium (held in place with small clamps until dry).

Oh, and this is completely off topic, but here are a few shots of Caribbean tranquility:


Wednesday, January 4, 2012

Grungy Monday 31 -- Happy Birthday Tim!

Linda Ledbetter, the brains behind Grungy Monday came up with a real winner this week....this Saturday is Tim's birthday, so Linda's challenge is for us to use whatever Tim products/techniques we'd like and create a birthday card for Tim.  I actually did mine on Monday, even popped it in the mail for Tim yesterday morning, but today is the first chance I've had to post about it.

While I was at it, I noticed that the challenge over at Simon Says Stamp and Show is "something old, something new," and my card (and envelope) fit this challenge as well, so here we go with another twofer.


It's an easel card, and what you see peeking from beneath it is the envelope I made for it....which is what constitutes the "something old" part of the Simon Says challenge.  It was made from a sheet of vintage advertising, attached to some sturdy cardstock.  And it was part of a package of goodies sent to me by my good pal Nancy in Arizona.  (BTW, the "something new" is the distressed doily on the edge die I used to keep the easel open.....it was the very first time I used that die).

Here are some more shots of the card and some of the supplies I used.


The background paper, as well as the paper used on the triangles is from Tim's Lost and Found paper stack.  The letters that spell out FUN are Jenni Bowlin stickers, and they are attached to cardstock, placed inside blank brads (an old Stampin' Up product), and the whole thing covered with a layer of glossy accents.  I edged the triangles with some white paint so they'd show up better against the background, and they're glued to the string with glossy accents.


The filmstrip was cut from the filmstrip frames die.  Where did I get a stamp that says "Tim?"  Haha, I didn't.  It is actually a stamp from an Oxford Impressions set that says "Time."  I just covered the e with tape before inking, and voila!  A Tim stamp.   (As I take a bow for my cleverness, LOL).


And here is a better look at the envelope.  Although I used s a strong adhesive to seal everything, just to be on the safe side (and to add a bit of decoration) I used tissue tape around all the edges. 


Oh, and my message to Tim is above the doily where it can remain unseen while the easel card is displayed; one of the great benefits of this style of card. 

Only one last thing to say:  HAPPY BIRTHDAY, TIM!!!


Wednesday, December 21, 2011

Rosette Snowman

Yes, I'm still here.  It's been over a week since my last post, but I've noticed that things in blogland seem to get quiet right after Tim's 12 Tags of Christmas finishes.  And I'm no exception.  What I've been up to.....working on collaborative books as they come my way, finishing Chanukah and Christmas cards, spending time with my mom, and trying to just sit down and create something for no specific reason.

When the rosette dies first came out I did a lot of experimenting with them and they really are versatile.  The other day Tim showed how to turn them into trees.  If you follow his directions for shaping the rosette you also have the makings of a sweet umbrella.  But that's not what I've been up to.  I decided to try my hand at a rosette snowman.


I used all the rosette sizes for the body, which was cut from lightly patterned white cardstock.  After assembly, icicle stickles were rubbed around the edges.


The hat was made by glueing several layers of circles together (cut from patterned black cardstock) for the brim, and more (smaller) circles for the top, finished with one very small rosette....made by trimming some of the width from the smallest of the rosettes.  Caution:   you really must reinforce the rosettes with tape before folding, especially if you plan to cut one smaller.  If you don't, you'll wind up with a handful of pieces.


The broom handle is part of a paintbrush that was no longer brushing, and the broom itself was made with twine and a whole lot of glossy accents to keep it all in place.  It is attached to the snowman with thin wire.  The "hand" is a bit of twill ribbon that hides the wire.


I'm laughing right now because in this closeup I think it looks like a chicken.  However, if you go back to the full body shot, I do believe it does resemble a snowman.  The eyes are just black cardstock cut with a plain office supply hole punch.  Can you guess what the nose is made of? 
I sacrificed the tip of an orange crayon for that.

Happy Chanukah, Merry Christmas, and Happy New Year to all my friends in blogland!

Thursday, December 8, 2011

The 12 Tags of Christmas -- Day 8

Ah, be still my happy heart.....today Tim went all steampunk on us, and I love it!  Not for everyone's taste to be sure, but I have always been drawn to those industrial/sci fi images, and using them on a Christmas tag is just plain fun.

I have a lot of steampunk stamps, dies, embossing folders, and even some stickers and rub-ons.  I have gears, watch parts, all sizes of small light bulbs, springs, and other assorted industrial type metal bits.  Lots to choose from.  So, while I followed the general layout of Tim's tag, and did use his background techniques on the tag, I pretty much went off and used what I had.  And had a blast doing so.


Instead of using the gadget gears die, I chose the steampunk on the edge die and attached it to the right side of the tag.  It was cut from grungeboard, pounced with gold and copper paint, then distressed and sanded and covered with both walnut stain and black soot distress inks.  Some of Tim's idea-ol-ogy pieces were attached to the top.


Tim's steampunk set includes a stamp of three men.  Since I don't have it, I used the stamps I do have, from Oxford Impressions.  I added a little something to one of the guys to put him in the right holiday spirit.


The santa hat was cut freehand from a scrap of grungeboard and covered with.....are you ready?.....flock.  Yep, good old flock.  I'm sure I haven't used any in years, but when it came out and was all the rage, I must have bought it in every color.  The other fella's hat was covered with glossy accents and he has some holly (mini movers and shapers die) and berries (stickles) on it.  Both gents have stickled bowties.  As for what's on the bottom.....I raided my steampunk box (yes, I have one) and came up with some springs and an odd looking piece (in between the two springs) and attached them all together with brads.

Tim's tag has a ticket with a pointing hand, letters made shiny with glossy accents, and one of his miniature lightbulbs as an accent.  Here's how I put some of those elements together:


I used the Merry Christmas ticket stamp from Tim's odds and ends set.  It doesn't show up very well, but the number 25 got the glossy accents treatment.  The bit of chain is held onto the ticket with staples (Tim's tiny attacher), and a miniature (decorative only) light swings from the end of the chain along with one of Tim's lightbulbs.  I used a pointing hand stamp (one of Wendy Vecchi's) a bit differently too.  It is on a memo pin, which was stuck behind the santa hat.

I love Tim's tag, and I'm thrilled with my version.  But if you don't love steampunk you probably won't much like either.  Me, I'm as happy as can be.


Thursday, September 22, 2011

Steampunk With A Feminine Touch

Yes, I know I said yesterday that would probably be my last post until after the cruise, but I got an inspiration for another steampunk tag, and had to roll with it.

Usually steampunk, being all about gears and machinery and Victorian images, has a masculine feel to it.  Thanks to Graphic 45's gorgeous Steampunk Debutante line, it can also be soft and lovely.  One of their images was really speaking to me and it wound up on this tag:


For the background I layered two DCWV papers.  I cut out the beautiful debutante and then added my own embellishments.....glossy accents, glaze pens, and a bunch of tiny watch parts from my stash to go with those already part of her hairdo.  I hope you can see all those details, and I also hope if you click on the photo the enlargement isn't a fuzzy mess, which has been happening lately.

And now, I really do have to stop and get packing!