Showing posts with label rosette. Show all posts

Thursday, March 28, 2013

Vintage Ancestors - A Jilted Lover

Karen's Vintage Ancestors book begins with two lovers, separated by the Civil War.  Sarah and Lawrence write to one another, professing their undying love, until.....Elena gets her hands on the book, LOL.  Then, it's all about Sarah leaving Lawrence for his brother Timothy. 

As I continue the saga, Lawrence responds to Sarah's "Dear John" letter, and I do believe he takes the high road (while getting in a few well deserved zingers).

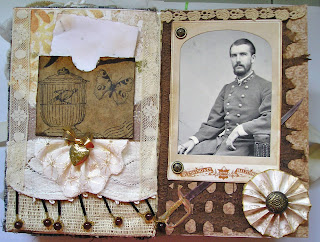
First, the two-page spread.


I used fabric and paper scraps to create what I thought a journal made by a young woman might look like. 


On the left, a pocket (a Tim Holtz glasseine envelope covered with 7 Gypsies tissue paper) holding the letter Lawrence wrote after receiving the bad news from Sarah.  Pinned to the fabric below is a bauble I had in my stash.  Yes, the heart opens, and yes, there is something inside.  A lock of hair, perhaps?  Too creepy?  Well, how about a lock of doll hair, then?
 
I did some research, and my friend Google found a photo of a Confederate officer.  Not a general (they all seemed so old); I think this one is a lieutenant.  And his sword is a Confederate foot officer's sword.  I printed it out and covered it with Glossy Accents and then cut it out with my trusty craft knife.  What I really liked about it is that the site where I found the sword said that it was made by a sword maker in New Orleans.  Karen's characters are from southern Louisiana.  Fate!


Although I have Tim's rosette dies, I made this one the old school way, by doing accordian folds.  I wanted it to look like it was made by hand, as I'm reasonably sure that Sarah did not own a die cutting machine.  In the center is a button from my stash.
 
The two brads on the cabinet card are from Stampin' Up, and I've had them for years.  I thought they kind of looked like the buttons you might find on a military uniform.  Speaking of cabinet cards.....the holder for the photo is not authentic; it is a replica, also courtesy of Mr. Holtz.  Because the back of the holder had cool stuff on it, I separated it from the front and will use it in another project.
 
And, lastly, here is the letter that broken-hearted Lawrence wrote.  If you have trouble reading it, click on it and it should get large enough to decipher.


Will Lawrence survive the war and find fortune and love in California?  Will Sarah and Timothy actually marry?  Will we ever even know?  Well, that all depends on those who receive the book after me.  They may continue the story or go off on another track.  And someone further down the line may decide to go back to the current story line.  That's one of the things I love most about this particular journal;  you just never know who might turn up in a family tree, and what they will be doing.


Saturday, November 24, 2012

Seasonal Wreath

I haven't purchased very many new products lately; not because there were none I liked.  I liked plenty.  The thing is, I already have so much, including some stuff I've never even used.  However, once I saw Tim Holtz's snowflake rosette dies I just couldn't resist. And as soon as I opened the packages I knew exactly what I would do with them first.

I wanted to create a wreath that could stay up throughout the winter, one that did not scream Christmas (no offense to anyone, but I don't celebrate the holiday), and in a color palette in keeping with the season (but no red and green).

Here's what I came up with:


I used both the regular sized and mini snowflake rosette dies, cut from some white on white scrapbook paper, and then lightly glittered.  The small non rosette snowflakes are also from Tim; they are his movers and shapers minis, and they were cut from some of the blue paper in his Vintage Shabby paper stack.  I rubbed some Stardust stickles on those.  The white "ornaments" are really some fake pearls from a broken necklace.  They too have a light coating of stickles.  Everything was put together and attached with a glue gun.  Yep, I went old school on this, and really, the glue gun is the best way to assemble the rosettes and get them to stick (with no drying time) to the wreath base.  Speaking of which, it is just a 10" paper plate with the inside cut out.  It was wrapped with some white lace so any section not completely covered with the rosettes and other embellishments would look pretty.


I think my next project with these wonderful dies will be the 2012 version of the snowman I made last year with the original rosette dies.  Remember this guy?  I love him!  Can't wait to give him a playmate.


Wednesday, December 21, 2011

Rosette Snowman

Yes, I'm still here.  It's been over a week since my last post, but I've noticed that things in blogland seem to get quiet right after Tim's 12 Tags of Christmas finishes.  And I'm no exception.  What I've been up to.....working on collaborative books as they come my way, finishing Chanukah and Christmas cards, spending time with my mom, and trying to just sit down and create something for no specific reason.

When the rosette dies first came out I did a lot of experimenting with them and they really are versatile.  The other day Tim showed how to turn them into trees.  If you follow his directions for shaping the rosette you also have the makings of a sweet umbrella.  But that's not what I've been up to.  I decided to try my hand at a rosette snowman.


I used all the rosette sizes for the body, which was cut from lightly patterned white cardstock.  After assembly, icicle stickles were rubbed around the edges.


The hat was made by glueing several layers of circles together (cut from patterned black cardstock) for the brim, and more (smaller) circles for the top, finished with one very small rosette....made by trimming some of the width from the smallest of the rosettes.  Caution:   you really must reinforce the rosettes with tape before folding, especially if you plan to cut one smaller.  If you don't, you'll wind up with a handful of pieces.


The broom handle is part of a paintbrush that was no longer brushing, and the broom itself was made with twine and a whole lot of glossy accents to keep it all in place.  It is attached to the snowman with thin wire.  The "hand" is a bit of twill ribbon that hides the wire.


I'm laughing right now because in this closeup I think it looks like a chicken.  However, if you go back to the full body shot, I do believe it does resemble a snowman.  The eyes are just black cardstock cut with a plain office supply hole punch.  Can you guess what the nose is made of? 
I sacrificed the tip of an orange crayon for that.

Happy Chanukah, Merry Christmas, and Happy New Year to all my friends in blogland!

Monday, December 12, 2011

The 12 Tags of Christmas -- Day 12

So, it's the 12th and final tag of Christmas for 2011.  Kinda sad, but I think Tim and Mario need those 6+ hours back each day, not to mention running all over Prescott looking for a signal when their internet goes down.  Thanks for the fun, guys.  Your generosity is beyond measure.

Today's tag features one of Tim's little faux frozen Charlottas.  You know, those bizarre porcelain dolls with missing limbs.  I don't have any of his version, but I knew I had a bag full of some I'd gotten on the internet, but when I looked......no bodies, just heads.  Even more bizarre.  So, that caused me to change up my design quite a bit.  One head would have looked a bit lost sitting on top of the artful dwelling that Tim used.  So I did a rosette instead.  Which would lead to another change, and another......well, before I go into all that, here is my tag:

First, I should mention that I did use the background technique with Tim's tissue paper.  What I added after the stickles was some weathered wood distress stain.  And under the tissue paper I used the background stamp from the Papillon set.  Much of this is covered with the tag's embellishments, but it is a really lovely background.

I don't have the decorative strip die that Tim used to make the faux German scrap, so I thought I'd try one of my border punches.  Varied success.  The first one I tried, a Martha Steward punch, didn't cut through the metal tape all the way.  My second choice, also one of Martha's, worked perfectly.  Go figure.   If you don't have any decorative punches, maybe you still have one of these oldies but goodies lying around:


That's right, decorative scissors work like a charm.  And if you want more detail, you can pair them with a decorative hole punch.  Here are some examples.  The first is the border punch I wound up using; all the edges of the ones that follow were done with scissors.  The one in the middle also has my tiny flower shaped hole punch.


A closer view of my faux German scrap (the metal tape I used was glaringly bright so I toned it down just a bit with some black archival ink):


For the letters, I did use Tim's tip of cutting them twice; once from the cardstock covered with metal tape, and once from black cardstock.  They really do pop.   And I discovered that if you attach your metal to textured cardstock, when you run it through your die cut machine the letters take on that texture.  How cool is that!  Good way to use up those pieces of paper with nice texture but hideous color.  You know, like that neon paper pack that was such a big bargain.  :))


I made a tissue paper flower, following Tim's easy directions, and it is so sweet:


Too bad I couldn't find a use for it on this tag.  Remember, I opted for the rosette, and it and the flower were just too close in size and shape, and looked terrible together.  So, I adapted another of Tim's tissue paper techniques, and using my trusty fringe scissors (yes, I really do have a pair), I followed the pom pom directions, but stopped just shy of  making the pom pom and popped the fringe behind the rosette.


I haven't figured out yet what will occupy my early mornings now.  Sleep, maybe?????


Monday, October 10, 2011

OMG, A Non-Cruise Post!!

Grungy Monday #22 - A Tim Inspired Halloween
and
Simon Says Stamp and Show Something With Wings


I was so happy to see Grungy Monday reappear, and lucky for me, I was able to create something that also works for the Simon Says challenge this week.

I'm not much of a Halloween person, but I know plenty of people who are, so this tag will be headin' out sometime soon.


The base is a black Ranger tag which was embossed with Cuttlebug's spiderweb folder.  Embossing ink was swiped over the raised parts and then brushed with copper and grape Perfect Pearls.  The top of the tag (where there was no embossing, is covered with some of Tim's Halloween tissue tape.

The bird is from Tim's Raven/Scaredy Cat die.  It was cut from grungeboard, inked with black embossing ink and covered with black embossing powder.  Then it got a coat of rock candy crackle paint.  When I went to finish drying it with my heat tool it did some crazy bubbling, but I'm going to say it was deliberate because I like the texture.  (But it really was a happy accident).

Behind the bird are both sizes of the mini rosette die. They were cut from some Cosmo Cricket Halloween paper that I've had for about two years.  The Happy Halloween ticket is hanging from a bit of ribbon behind the raven.

OK, I think I'm done with spiders and black cats and ravens and witches.  Bring on Santa!

Friday, September 16, 2011

Getting Distressed on Inspiration Showcase

No, not distressed as in annoyed, but you knew that.  Today's video is all about distress inks and stains, and the techniques are fantastic.  Just when you thought you knew them all.....along comes Jennifer McGuire.   But before I get to that.....

The way Jennifer has the class organized, one day she presents five techniques and we do our samples, and the next day she goes into greater detail about one or two of them and shows ways to use them in cards and other projects.  Yesterday, she focused on embossing on acetate and ways to alter rosettes.  I put the two together in one tag, with a steampunk theme.  There is a method to my madness.  I signed up for a steampunk tag swap on ATT and I'm getting a head start.


I used Tim's Steampunk embossing folder on the acetate, and it is backed with some brownish cardstock.  The lovely lady is from Graphic45's Steampunk Debutante line, and I altered her in two ways.  First of all, I replaced the hot air balloon that is her skirt with the very layered and altered rosette I made, and secondly (and I don't know how well this shows up in the photo),  I added lots of lines on her with a copper colored glitter pen.  I topped the tag with a bit of a zipper to continue the steampunk industrial look.

Now, onto today's samples.  Again, sorry I can't go into details but once the class is over you will be able to get the PDFs.  The link to get more information is on my last Inspiration Showcase post.

 pearlized distress resist

 distress stamping
 stamping with water and metallic paper wing

 color blend stamping with distress dots wing

fingerinking (as much fun as it sounds) with distress ink watercoloring wing

Can you believe the amount of information so far?  And this is a two week class!  And, it was only $19.  Maybe the best bargain I've ever gotten.

Tuesday, April 19, 2011

A Little Trash, A Little Stash

So, this is the challenge:  make something with unusual elements, recycled items, or repurposed ones.  Hmmm.  Well, this is the trash I started with:


  • brown paper bag
  • tabs from Diet Pepsi cans
  • catalog
  • plastic packaging material
  • cork from bottle of wine
And abracadabra, this is what I wound up with:


First of all, I took that cork and carved a little design into it to create my backgrounds.  I stamped it repeatedly onto tags with black acrylic paint.


I recently had a nice meal with my friend Pat and we finished a bottle of wine. (No big surprise there.)  I took the cork home, knowing I'd use it in something, but didn't have stamp making in mind at the time.  But doesn't it create a cool graphic?  And on some tags I angled the stamp differently, resulting in new patterns. 
When the paint was completely dry, I swiped each tag with a different color of distress stain.  Instant and vibrant coverage.  Here's a closer view of one of the tags:


The soda can tab was glued to the top as the ribbon holder.

The rosette (Tim's new mini) was cut from a page in the catalog.  After assembly, it was pounced with some gesso, and when that dried, it got a spritz of color wash.  Now it's a flower.
The flower center is a pom-pom kind of thingy made from a strip of the brown paper bag.  I rolled it tightly around a thin paint brush, glued it together, then made several cuts from the top to just above the base to create that fringe, and glued it down with matte multi medium.

The leaf was cut with Tim's new mini leaf/branch die from the plastic packaging material, colored with markers, and heated for a moment so it could be bent a little.  I could have also used alcohol inks, but the markers were closer and didn't require moving three boxes to get to.  Sometimes I think this blog should be called Memoirs of a Lazy Crafter.

Some ball chain from my stash created the stem.

The lovely sentiment is a Wendy Vecchi stamp, cut apart so the words would fill the empty space on the side.


Thursday, March 3, 2011

From Perfect Stamping to Perfect Lathering

Just so you know, it sometimes really hurts my head to try to come up with a catchy title.  I'm workin' hard here!  Anyway......this is week 4 of the Making Art! challenge on the Wendy Vecchi yahoo group.  Much like the Compendium of Curiosities weekly challenges where we make art inspired by techniques in Tim Holtz's book, we are basing our creations here on projects from any of Wendy's three (the fourth is due out any minute now) books.  This week, we are to make a tag, and use Wendy's perfect stamping technique.  Now, she calls it perfect stamping, not because she's an egomanic, but because it involves Perfect Pearls.  Check it out on page 10 of Book 1, or.....click here to learn about it on her blog.

This is a super cool technique, and involves a way to stamp that I don't think I would have thought up on my own.  That is one of the things I most admire about Wendy.  She is so good at figuring out new ways to use the products we already have.  So, here is my tag:


The tag was first inked with these distress inks:  peeled paint, shabby shutters, and broken china.  For the perfect stamping, I used black soot and chipped sapphire with turquoise perfect pearls, and the background stamp from Well Worn Art.

When that was dry, I added the swirly flowers from Botanical Art, stamped with olive archival ink.  The alphabet along the right side is from Lower Case Art, and was stamped with black archival ink.  The phrase dare to be unique is from Seriously Art.  Yep, I have LOTS of Wendy's stamps.

The rosette was leftover from a previous project, and I topped it with a butterfly using Wendy's latest genius technique.....combining her Clearly For Art plastic with a sheet of metal.  To find out more about this, and why I think it's genius (or magic), click here.  The butterfly stamp and the little spider (stamped with black soot and embossed with black EP) are both also from Botanical Art.

What else?  Oh, the scallop trim on the bottom was cut with Tim's on the edge die and it is tissue tape over cardstock, inked with fired brick.  And yes, that is a pen nib I used as the body of the butterfly.  Speaking of which, did I ever score big on the nib.  Last Saturday when I trekked to Brooklyn to visit the Sketchbook Project, I found, amongst the various paper products, old books, etc. they were selling to earn some $$, an unopened box, original packaging.....containing a gross (that's 144 for those of you who were as bad in math as I was) of the nibs for $12.  Perfect (that word again) condition, and I'd say at least 50 years old.

And my segue into the perfect lathering portion of this program.....another cool thing I did last weekend was attend a workshop in felted soap.  Right here in my building.  We have a large community room and often one of us will share a skill by giving a class.  I occasionally do something with paper, but this time my neighbor Theresa showed us how to cover a bar of soap with unspun wool.  It was wet, it was easy, it was fun, and I love my soap (which, by the way, is lavender scented and heavenly):


Why cover a bar of soap with wool?  1) it makes the soap last longer  2) it is very pretty   3) the soap is no longer slippery  and
4) it is like having soap and washcloth in one.

Theresa asked for $6 to cover the cost of materials, and just so you know, Anthropologie sells felted soap for $14 a bar.  I'd send you to Theresa's blog, if only she had one.  She also makes gorgeous hats, scarves, wall hangings, and even boots with the wet felt method.  If you'd like to see a DIY on felted soap just put that in your search engine and you'll see lots of examples, even one from Martha.


Monday, January 10, 2011

A Masking Triple Challenge

Oh, lucky me....this week both Simon and Linda say:  show me some masking.  Well, Linda actually says to do the distress misting masks technique, but you see my point.  Two challenges, one technique.  Hence, the oh lucky me comment.  And what does the word triple refer to in my blog title?  Both challenges are posted by 8am my time, and at 10 I have to leave for the airport.  So, the third challenge is a personal one.  Create something and blog about it in time to finish packing and get out of town.

I had fun with this one, because a) I love masking and b) I love spraying and c) I love greens and blues, my chosen colors and d) I love embossing, not that anyone told me to emboss, but I threw that in anyway.


If it looks a bit unfinished, two reasons for that....I just didn't want to cover up the masking on the bottom.  I think it looks too cool to hide.  Also, at some point I plan to add a small sentiment down there and send this off as a card.  It has NOTHING to do with my time constraints.  NOTHING.

What did I do?   First I put some color (wild honey and broken china) on a piece of cardstock.  Then, I placed a Heidi Swapp mask down and followed Tim's technique.   A bit more color was added with the blending tool, then another mask (Tim's flourish) went down, and more misting (with different colors). 

When all that goodness dried (OK, I rushed that along with my heat tool), I cut the tag shape and then ran it through the regal flourishes embossing folder.  Last step on the background.....highlighting the raised area with some forest moss.

I went through my box of semi-finished projects and found the rosette and grungepaper flower (made with some of Wendy Vecchi's stamps) and added those to the top, since the colors went well with the tag.  (There are some scallops behind the rosette).

Phew....now I can enjoy my visit with my mom without wondering if I'll be able to do this week's challenges.  I know what you're thinking, but I admit it....I'm addicted to these challenges and hate the thought of missing any.

See ya in about a week!

Wednesday, December 22, 2010

The Compendium of Curiosities Challenge #25

Thanks to the couple of folks who noted my absence from the blogosphere and asked how I was.  Well, I've been battling a terrible cold that has knocked me out and made me very tired and lazy.  It's hard to get creative when your workspace is a mess and you lack the energy to clean it up. 

I pushed a few things to the side (and most landed on the floor), and made myself enough room to work on CCC # 25, which is scribble stain distress.


Yes, sadly this is the cleaned up version.  But there was a tiny bit of usable space on the table.

I'm still in tag mode, so I pulled one out and opened Tim's book to see what this technique is all about.  And it turned out to be one I've never used.  That really helped me get into a creative zone, so I did my best to ignore my sneezing and sniffling, and came up with this:


I actually used the technique twice:  on the background of the tag itself, and also on the paper (plain copy paper) I used to make the rosette.

The fleur de lis in the center of the rosette was pewter colored metal which I altered with Tim's chipped enamel technique (except instead of using distress embossing powder I used one of my favorites....verdigris from Ranger's Antiquities line).  The folded "ribbon" under the rosette is tissue tape over scrap cardstock to give it more heft.

The baubles attached to the top of the tag are all handmade from beads found in my donated stash. (That would be the big box of costume jewelry given to me by friends, family, and neighbors who may not understand what I do, but are happy to help out.)

Now, if only I can muster up the needed ambition to bake the cookies I always bring to my friends for Christmas dinner........


Thursday, December 9, 2010

The 12 Tags of Christmas -- Day 9

BEAUTIFUL tag today from Tim!  And I got to make rosettes!  I'm much happier with today's efforts.  Although, I have to say, the more I look at my day 8 tags, the more I like them.  Sigh....all that whining for nothing.  (I'm sorry about that!)

Besides the rosette, today's techniques included a background with distress inks and Perfect Pearl Mists, and smashing brads with the texture hammer (which I didn't do).  Tim's tag is gorgeous in browns; mine is also monochromatic, but done in greens.  (And my Wendy version is mostly blue).

So, here is mine (not the clearest photo I've ever taken, but you'll get the idea):

I used the same Christmas Carol stamp on the background (in black archival ink), then bundled sage, peeled paint, and pine needles distress inks with a spray of heirloom gold mist on top of that.  I have a different alphabet than the one Tim used, and the letters (dark green Core'dinations paper) are a bit larger, so there wasn't much room for the embellishments.  I used my own buttons and made my own baubles.

Tim put tinsel around the rosette, which I don't have, so I used some eyelash yarn from my knitting stash.  And instead of the brads on the bottom, I used some half pearls.

My Wendified version:


I used one of Wendy's stamps instead of the music one (with coffee archival ink) for the background.  Over that, broken china, stormy sky and faded jeans distress inks and the spray was blue smoke. 

Another difference was I took my paper for the rosette from the vintage shabby stack instead of the seasonal stack.  No tinsel, as I said, but I found some sparkly blue stuff and used that.  Again, I used my own buttons and made my own baubles.  On the bottom, a row of rhinestones instead of the beaten up brads. (I guess I just didn't feel the need to pound anything today.)   The letters were cut from a periwinkle Core'dinations paper in the whitewashed stack.  If I had anything to do over, it would be the color of the letters.  Not enough contrast with the background.  Other than that, I'm good with this tag too.

Tuesday, November 30, 2010

Simon Says: Stamp and Show..... A Tag

No CCC this week....Linda has decided that through the holidays, all challenges will be for a two week duration.  (Click here if you need to be reminded of the current challenge).

Over at Simon Says Stamp and Show, we're to show everyone a tag.  My entry is kind of a warm up for Tim's 12 Tags of Christmas scrapaganza, which starts tomorrow (be still my heart!)

And here it is:


I began by copying  borrowing  Wendy's technique for creating a plaid with ink and tissue tape.  Except, being frugal, I didn't want to waste any of my tissue tape and used painter's tape instead.  Shabby Shutters and Barn Door were the inks I used. 
Then I ran the tag through my Big Kick in Tim's Sheet Music embossing folder, and highlighted the raised areas with Pine Needles.
The trees on the left, in the background are from the Stampin' Up set, Lovely As A Tree (one of my all time favorites), and Pine Needles was used there as well.
The lighter colored (Shabby Shutters and Peeled Paint) trees in the foreground were made with Tim's Tall Pines embossing folder, and cut out.  The snow was done with white Liquid Pearls.
Santa is from Tim's seasonal paper stack, and he's blinged out a bit with Forest Moss and Barn Door stickles.
On the bottom.....I covered paper with Christmas tissue tape, then cut it with Tim's Snow Flurries on the edge die.  It was then heavily inked with Barn Door.
I made a rosette from some dark green ribbon and placed it behind the snow flakes.
My good old Dymo label maker was used to create the words silent night, and Tim's Tiny Attacher adhered then to the tag.
Some ribbon and two tiny jingle bells finished it off.
Yep, I'm most definitely warmed up for tomorrow!

Saturday, October 30, 2010

Things To Do With The Rosette Die On A Chilly Afternoon

Okay, so it doesn't have to be chilly, but it is here, and I'm happy being indoors with my creativity hat on.
I spent much of the morning and into the afternoon playing with Tim's fabulous rosette die.  I don't know what it is about making rosettes that is so much fun, but it's like an addiction.  You can't just make one....
And I love the challenge of finding new uses for things.
I started out by cutting some of the width off of the die cuts before assembling, so I could have some layers.
And here is my three tiered flower:


I'm reminded of those little cocktail umbrellas when I look at a rosette, so that was the next project.  I glued a circle on only one side of the rosette, weighed it down, and when it was totally dry, I formed the umbrella shape and glued a smaller circle on the other side.  I used a Maya Road stick pin as the umbrella handle.


Not that I have any immediate plans to use the umbrella; I just wanted to see if I could make one.  Right now both it and the layered flower are just decorating my bulletin board.

My final rosette challenge of the day....bird feathers.  Yep, you heard me right.

Start with a rosette strip.

Cut it into two pieces, one a little larger than the other.

Run a line of glue across the straight edge.

 Do the fan fold and secure the glued edge with an alligator clip.  Do this to both pieces of paper.

While secured by the clip, fully fan out the rosette piece.


On the smaller one, cut each fold on an angle and separate the paper at the perforations.


Use the larger piece as tail feathers and the smaller as head feathers.
I'm thinking this is only the beginning.  I just KNOW that there are even more things to do with the rosette die on a chilly afternoon.