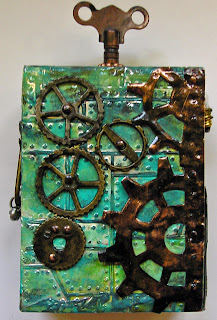
I completed mine a while back for a swap in my Kindred Souls group, and just found out that I'm to send it to my great friend Elena, which is a relief, because the theme I chose, steampunk, is one I know she'll like. So, Elena, you know the drill....if you'd like to be surprised, look no further!
I began by embossing two of Ranger's foil tape sheets with Tim's industrial look folders: diamond plate and riveted metal. What's great about the tape is that it has a strong adhesive backing, so adhering it to the wood was easy. Then I went crazy with the Ranger/Vintaj patinas I have come to love so much. And then.....the real fun began.....finding just the right steampunkish elements to add to the piece.
Some gears and sprockets from Tim's idea-ology collection, including the newish mini gears, which I just love. The focal image is from a stamp in his steampunk set. I cut it and inserted it into whatever that doodad is (a 7 Gypsies doodad), filled the top with glossy accents, and surrounded it with some copper colored ball chain. On the bottom, also cut from the foil sheet, a bit from Tim's washer border decorative strip. The sentiment is also Tim...one of the word bands all patinaed (word???) up.
Here's a closer look of the main image:
On the flip side:
More gears, some from 7 Gypsies, and one I'm not sure of. On the right edge, I used Tim's steampunk on the edge die to cut some real copper sheeting that my darling brother found and presented to me recently. It's important to train all your non crafty friends and relatives so they know just what sort of junk will make your heart go pitter patter. When I saw all the copper he'd found I definitely was on the verge of needing CPR. It too, was altered a bit with the patinas.
Now, for the "sides" of the ATC:
The fellow with the camera is a Wendy Vecchi stamp, colored with distress markers, and enhanced with some glossy accents and a black glaze pen. Behind him, some more of that washer border, and on top of that, a tiny lightbulb from my stash. Here is a closer look of how I attached the bulb....wire and tiny copper nails (also courtesy of my bro). Those nails appear all over this ATC!
Next side:
This side has a strip of metal, attached with more of those copper nails, and over top a piece of idea-ology with some scrap chain attached.
The top:
If you're wondering how I attached the watch key (so it would stay attached), this is what I did. I first screwed it into the round piece of metal and then attached that metal to the top with a combination of strong glue and more copper nails. I added the copper ball chain to finish it off.
No photo of the bottom. Except for the metal it remains unadorned so that the piece will stand up nicely. But I'm thinking of adding some little feet, if I can find just the right items to use for that purpose.
If you'd like to try your hand at a chunky ATC, all you need is a two by four from the lumber yard. For some reason unknown to me (maybe it's a guy thing), the actual measurement of a two by four is
1 1/2 by 3 1/2". So, all you need to do is make cuts on it every 2 1/2" and you have the exact right measurements for a chunky ATC! Pretty cool, huh?


