Showing posts with label Glue N Seal. Show all posts

Monday, January 28, 2013

Butterflies A Poppin'

The most recent challenge at the Wendy Vecchi yahoo group was to make something that included some sort of pop up (could be done with the Sizzix Pop N Cut die), hearts, glitter, and at least one of Wendy's stamps.  This coincided with my needing a birthday card for a friend, and I had immediate inspiration.

After completing the card (which was more involved and took longer than I normally take in my card making), photographing it, putting it in an envelope for mailing, and posting it on the group site, I realized one tiny little problem.  Oh dopey me....instead of using hearts, I used butterflies.  LOL!  Well, I appealed to a higher authority (that would be list mom Lori), who assured me in her unique style that there would be no challenge po po coming after me, and my entry could remain.  Phew!

Although I do have the Sizzix die, I was intrigued by an accordian fold pop up card by Sandi Genovese (remember her?).  You can find the video here. (Thanks Vic for sending us the link!)      So that is what I used as my inspiration.

Here is the front of the card.  Deliberately plain, because all the action is on the inside.


The background is Graphic 45 paper, over which I stamped four of my many butterfly stamps (the two on the right are Wendy's).  The very top one was cut from another Graphic 45 paper, and attached only in the center, so the wings could flutter a bit.  The stamped butterflies were colored with distress markers.
 
The inside.....which, you'll have to trust me, is more impressive in person.  A little difficult for me to photograph well.


The largest butterflies are stamped images which were colored and cut out.  The four in the front row and the one in the middle of the second row are from that same Graphic 45 paper from which I cut the one on the card front.
 
The birthday greeting is a Wendy stamp.
 
 
The bottom of the inside is a strip of Tim's tissue tape.  The two stamped butterflies are Wendy's again, and those were covered with Glue N Seal and then sprinkled with distress dry glitter in clear rock candy.


Oh, and all of the paper on the inside is Graphic 45 as well.  I'm not sure of the collections they came from as I was just grabbing papers from my stash.....my not terribly well organized stash.


Sunday, July 8, 2012

Toss The Smokes; Alter The Box

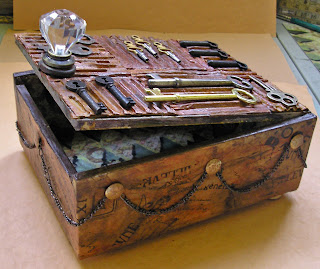
The Kindred Souls group is in the midst of a cigar box swap, and I was lucky enough to be paired with Neil, an awesome artist from England.  We briefly communicated and both decided that whatever each of us did would be fine.  I was happy to be making a box for a man, because I don't often get to do that,  and I did what I love to do......a little bit vintage, a little bit steampunk, a little bit grunge, and a whole lot of texture.   I just mailed the completed box the other day, and it will take about two weeks to reach Neil.  So, Neil, if you're reading this and would like to be surprised, step away from the computer or go visit another blog!


Above, a look at the box with the lid partially opened (yes, it closes nicely).  And now for some closer looks.  First, the top.


I took some corrugated cardboard and ripped off the paper covering one side, then cut it into different sized pieces for the mosaic look.  I used inks and stains to color the pieces until I thought they looked suitably grungy, and adhered them with a strong glue.  Then I went through my stash of keys, selected some and glued them down.  I wanted to attach some sort of knob to the top to aid in opening the box, but the craft knobs I had on hand (lots of them!) didn't have a screw long enough to go through the lid, and I had no screws in my junk drawer that would fit, so I wound up using a finial from an old lamp that worked perfectly.  It took a while to get the hole made, but an awl worked fine.


The sides of the box were covered with many scraps of patterned tissue paper and sealed with Ranger's Glue N Seal.  Oh, I used that on the top of the box too, by the way.  The chain goes all the way around the box and the swags were created by attaching the chain with plain old thumb tacks....which I banged up and colored with permanent ink to get a rusty look.


Decorating the inside of the box was optional, but I just couldn't leave it naked.  Here's what it looks like fully opened.  And next, photos of the inside of the box and inside of the lid.


For the bottom and sides of the inside I took some patterned paper and altered it with stamps and stencils.


The underside of the lid was covered with Tim Holtz's tissue tape, which was then colored with both Golden's fluid acrylics and distress inks.  And yes, everything was sealed and protected with more Glue N Seal.


I think boxes look nicer if they have some lift, so I added feet.....made from bingo markers.  The paper on the bottom of the box is plain old kraft from a disassembled grocery bag.  It was inked, crumbled, inked some more and glued down, without smoothing it too much so some of the wrinkles remained.  It may not look it in the photos, but I think it resembles leather. 

I left this out and opened for DAYS before packing it up (carefully enough, I hope) and sending it across the ocean.  Even though everything seemed dry after a few hours, you really want to make sure of that before shipping something like this.  I wouldn't want Neil to be unable to open it.  Speaking of which, before packing it up I did put a little something inside for Neil to discover.  No photo of that, so even if Neil decided to look, something will still be a surprise.


Tuesday, January 24, 2012

Cracked and Bricked

I'm happy to report that yesterday I managed to create a birthday card that is also OK for Grungy Monday Challenge 34, and the Simon Says Stamp and Show challenge.
The lovely Linda Ledbetter of GM, asked us to do something that incorporates Tim's crackle resist technique.  And over at Simon Says, we're to do a piece inspired by a song title.

I know this is not a card for everyone, but I'm pretty sure its recipient will like it.  It's grungy and graffiti inspired.


It started with black cardstock, which I embossed with Tim's bricked embossing folder.  I then applied a coat of antique linen distress crackle paint, thick in some areas, thin in others, just like Tim demonstrated in the video.  While the paint was still wet I removed some around the bricks so they'd be more recognizable as bricks.  Then I just sat and waited for the paint to dry and the crackling to begin.

I added some shreds of 7 Gypsies tissue paper to look like the remnants of posters on the wall.  Adhered them with Ranger's Glue N Seal and being tissue paper, they really did kind of "melt" into the wall.

The writing, deliberately wonky (well, that's my story and I'm sticking to it), was done by dabbing black paint through Tim's stencil type.

The shadow of the woman staring at the wall is actually a Wendy Vecchi stamp, from her Regal Art set.

As for the song title.....are you old enough to guess, LOL?  Well, it's Another Brick in the Wall, by Pink Floyd, released in 1979.  And now you have a pretty good idea of just how old I am!

Monday, January 16, 2012

Journal Pages With An Asian Twist

One of my favorite collaborative journals is turning out to be the one with the Asian theme.  Something about it has made everyone in the group create the most beautiful books for us to work in.  Every one I've received so far has been hand made and they are all just lovely.  The other day I received two in the mail from my pal Lee in Australia.  Yesterday I was housebound and worked on them all day long (well, with a few breaks in between to watch a White Collar marathon on tv).

First up, Daisy's book.  All her pages have a white border and black to work on.  Very dramatic.  Daisy also requested that we use no bulky embellishements or dangly things, so for interest I turned to texture.


Above, the two facing pages.  I started out by embossing black cardstock with Provo's Asian set.  The first page has the bamboo, the second the cherry blossoms.


I then swiped the embossed parts with clear ink and sprinkled some of Ranger's antique gold powder over top.  Sure, some of the powder went to the unembossed areas, but I didn't let that worry me, as I knew I'd be adding other bits to the page.  The gold strips are from torn up joss paper, which you can find online or in many shops in any Chinatown.  The flowers and bird are from a decorative napkin.  The chinese characters are stamped with clear ink and embossed with black powder.

Now, I know I'm mixing up Chinese and Japanese images, but I claim artistic license, and I hope no one reading this blog belongs to the purist/factual police and certainly don't mean to offend anyone.  The kimono is a Judikins stamp which I colored with metallic mica paints.  The gold frame around it was done with sticky tape and gold microbeads.  BTW, I covered the beads with a layer of Ranger's matte Glue N Seal, so they will stay put forever.


The close up above is a little fuzzy, but I wanted you to see the flower....fussy cut from a napkin, and after it dried I outlined it with a fine black permanent ink pen.  You can also see the embossed bamboo on the background.

I'm not sure how much of the shimmer shows up, but the entire kimono does have a subtle metallic glow. 

Next up, Carla's pages.  I started out with red textured paper, over which I glued a decorative napkin which featured cherry blossoms, but in an unexpected color palette....the whole thing just black, white, and gray.  Some of the red peeks through as pink, and I really liked the look.


After the tissue paper tried I stamped over it with clear ink and embossed the images with plain (not antique) gold powder. 


The square above is a stamp from an unknown company, found in my stash, embossed with gold, and popped up on the page with a few foam dots.  A heart shaped "coin" dangles from it, and I added some gold German scrap....not exactly Asian, but it works.


On this page I did something I've been wanting to do for a while.  I acquired a few small brass latches a while back and wanted to use them on a "door" on a page.  I used grungeboard so it would withstand bending from opening and closing it.  And yes, there is something to see inside....some images I took from the catalog my friend Kyoko gave me on the cruise. 


I glued a few select images together and then added the gold embossed stamping of the dragon and the dragonfly.  The red paper you see on the inside of the doors is really just there to cover the prongs from the brads used to attach the latches to the doors.


Wednesday, December 28, 2011

Grungy Monday -- Get Out the Tissues

This week's Grungy Monday is all about tissues.....Tim's tissue paper and tissue tape, that is.  The challenge is simple:  use either or both products on a project.  No other conditions or restraints.  So, remembering to be clever and multi-task, I decided to make a birthday card for my GM entry.


I started out with the idea in mind of using the tissue paper technique Tim used on tag 12 of the 12 Tags of Christmas this year.  Except that I didn't go back to review the steps.  I just plowed ahead, and as a result skipped a few along the way.  But no worries; my unintentionally simplified version works too.

I stamped the background with one of Tim's flourishy stamps, filling it up (using black archival ink), then covering it with a piece of the music tissue paper (using Ranger's matte Glue N Seal).  Since I skipped the step where you lighten the stamped images with Picket Fence Distress Stain, you can see quite a bit of the stamping under the music.  Which works for me.  I also skipped the wrinkling the tissue paper step as well as the cover it all with stickles step. 

To add even more tissue to the mix, the image I chose is actually cut from a decorative napkin, glued down with....you guessed it.....Glue N Seal.  I covered her printed feathers with some real ones and added a bit of bling in the center.

The bits of sparkle around the edges comes from Suze Weinberg's Beadazzles (in Purple Rain).  In case you don't know, Beadazzles are a great mix of micro beads and glitter, and I stocked up on a huge number of them at a Ranger Warehouse Sale a couple of years back.  I don't even know if they are still manufactured, but they are a very cool embellishment.  And a tip:  after adhering them to your project, a light coat over top with....yep.....Glue N Seal, will keep them all in their place forever.

The birthday greeting was made from Jenni Bowlin's mini letter stickers.

If you look closely, you can see some of the stamping/music tissue paper through the image of the dancer, and I think that is very very cool.