Showing posts with label ATCs. Show all posts

Friday, August 9, 2013

Time To Get Surreal

**Note:  I can't believe it's been almost a month since I last blogged. No, I did not fall into a hole, nor was I abducted by aliens.  I've just gotten kind of bogged down with life, and I'm working on eliminating some of the things that have been cluttering things up for me, both literally and figuratively.  Now, back to the scheduled program....


"If you see a bus crash into someone’s front porch while a caged dog barks in the side yard, near a man in a business suit who is grilling hamburgers, you might call that a surreal image. Things that are surreal combine unrelated elements to create a bizarre scene."

That's the definition of surreal that I found on Vocabulary.com.  It is also the theme of the current ATC swap at Michele's Little Bird Studio.  What to do, what to do?

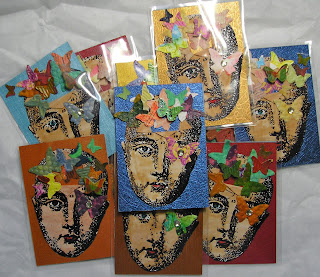
I've always loved phrenology head images and find them to be rather surreal, so I decided to start there, and used the Invoke Arts stamp.  And I decided that the head exploding and releasing butterflies would do the trick.


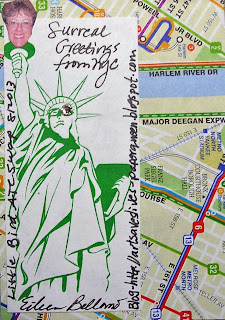
I figured the back should be as surreal as the front, and I always like to refer to my home town and favorite city in the world, so I came up with this:


C'mon, Lady Liberty with my head on a platter, gotta love it.
 
I'm delivering my swaps to Michele today, and I look forward to seeing what I'll be getting in return.


Wednesday, May 1, 2013

Heading East

Last weekend, with a to-do list longer than my arm, I abandoned everything I was supposed to do in favor of what I wanted to do.  I recently signed up for an ATC swap at Little Bird Creations, something I haven't done in years.  I literally have hundreds of these little works of art from years ago swaps, but have rarely done any since I've gotten into art journaling and collage.  Anyway, the theme is Japanese/geisha, and since I have a ton of related supplies, I decided to go for it.  They're not due until June, but you know how it goes with me and my stubborn muse....strike while she is hot or she will run away and hide.

I began by covering a sheet of 8 1/2 x 11" cardstock with some Japanese text.  I remembered a trick I'd read for getting 10 ATC from one such piece of paper, and cut them out.  Here's this handy tip:

1. Cut two lengthwise strips 2 1/2" wide, leaving one strip 3 1/2" wide.
2. Cut the strips crosswise: the 2 1/2" strips will be 3 1/2" wide, and the 3 1/2" strips will be 2 1/2" wide.

Then I added some texture with this embossing folder (I was able to do two ATCs at a time):


And then some transluscent color with these paints:


So much for the background; now onto the main image, which I got from this:


The above is 8 1/2 x 11", so I only used the head and shoulders, and that pretty much filled up the ATC.

All of this resulted in:


To color the images, I used my favorite cheap-o art supply:


And to decorate the colored kimonos, I used some of my favorite pens.  Because the Portfolios have a waxy surface, not every pen will write well over them.  I've ruined many a good pen learning this, but my Sharpie poster paint pens, Molotow acrylic pens, and Sakura glaze and souffle pens glide over the Portfolios with no problem.


Although the design is identical, the decoration changes from ATC to ATC.  And though it wasn't my intention,  even the faces all look different.  The face on the original image was very faint, so I had to go over the lines with a pen.  Even the slightest difference in my drawing changed the expression.  I'm not complaining, just explaining.  And of course I totally enjoyed coloring and doodling on the clothing, using varying colors and patterns on each.


I used very narrow red German scrap for the hair accessories.  The flowers are tiny Primas over small Stampin' Up blooms, with a dot of platinum stickles in the center.


Thursday, November 8, 2012

Lovin' Lace Is No Disgrace

Sorry about the title.  Sometimes the quest for cleverness only results in corniness.  Hey, this is the best I can do on two cups of coffee.

A while ago I agreed to be a part of an all fabric round robin called Vintage Lace.  Though I love to look at fabric books and admire the artists who make them, I'm not much of a fabric person.  Paper is my usual medium.  I have ventured off into metal, and yes, I have used fabric in my creations, but a book made almost entirely of fabric and lace?  I say almost, because embellishments of every type are allowed.  Anyway, I joined and wondered if I'd be sorry I did.

One day, I saw a fabric book embellishment that appealed to me, and decided to start with that.....creating a focal point for my book.  Start small.  Baby fabric steps.  One thing led to another, and the project seemed to take on a life of its own.  One weekend later and I was almost finished.  Guess I have a new obsession. 

Here is my completed journal cover  It measures about 10"x11", including the trim.


As you can see, it is not only a medium I don't often use, but the color palette is also unusual for me.  Oh, and by the way, about 99% was sewn by machine or hand.  Very little glue was used.  Color me proud of myself!
 
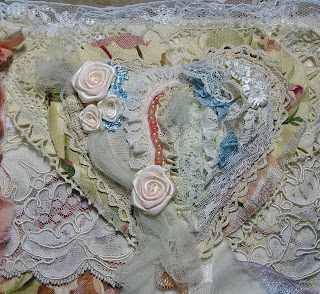
The focal point is the heart, which is very dimensional, being stuffed with fiber fill.  I'm sure quilters don't use the term stuffed, but I have no idea what the correct term is.  Anyway, here is a closer look at the heart.  Beads and lace and tulle and flowers, oh my.


OK, confession time.  Originally the heart had a photo transfer on it, but I absolutely hated the way it came out, so I just added more trimmings right over it.  Like I always say, mistakes are just an opportunity to embellish.
 
I had fun with the spine, and am very happy with the way it turned out.


It's made of torn strips of fabric with lots of buttons sewn on.  If I live to be 100 I won't deplete my button supply, so it was good to be able to use so many in one project.
 
I'm not really totally satisfied with the back of the book, but I have until December to send it off to the next artist, so there's time for additions,.


I think the yellow lace is bothering me, so I may just soften it by covering it with some more off white lace.  We'll see.

I've kept the inside covers fairly plain (for now), but since I very much like the eyelet lace fabric I used, that's OK.  I did create a pocket for the inside front cover, though I haven't a clue what I'm going to put in it.  Maybe little gifts for the other participants????  BTW, this is a VERY small group; there are only 5 of us, so that idea isn't too far fetched.


We are also doing one page of our own to send along with the cover.  (The book will be bound upon its return).  I have worked on mine; it is unfinished but getting there.   We all chose themes for our books (someone chose Paris, another, fashion).  I chose accessories because....do I really have to explain?  What is better than accessories?  What embellishments are to crafts, accessories are to fashion.  The complete it, enhance it, and let's be honest.....you don't have to go on a diet to fit into your favorite hat, pair of gloves, scarf, necklace or brooch.    But I digress.  Here is my work-in-progress page.


When my brother and I were cleaning out our mom's Florida condo after bringing her back north to live, I found a pair of long lacy gloves.  I have not a clue why my mother had them; they are so not her style.  But I love the idea of using them in my art.  This is a very tone on tone page and I just want you to know that it is a lot more interesting in person with all the different textures.  And, remember, it is unfinished.
 
The ringleader of this group is my friend Sox.  Yep, for a change one of our projects didn't come from Elena's fertile mind.  Since we're not launching until December, Sox decided we should prime the creative pump by doing a fabric/lace ATC swap.  I worked on mine this weekend, and here they are, all five of them.  Yes, I am keeping one for myself.


The very much simpler (yet also stuffed!) heart is a nod towards the one I made for my cover.  It's actually the only part of the ATC that was sewn.  I am not good enough on the machine to sew in such small spaces, and I lack the patience to completely hand sew the whole shebang.  So yes, glue was most certainly used.


This is what the back looks like.  I used sticky back canvas, attached to the front, and it was also used on the dress form (Tim Holtz die).


Monday, May 14, 2012

Two Projects, Three Challenges, and a Cool Technique

I know I said no more challenges or swaps until I finished some old projects, but I couldn't resist this month's tag in Tim's 12 Tags of 2012.  It features the beautiful faux porcelain technique, and it found me in the mood to haul out the melt pot.

I don't like copying Tim's tags exactly, so I just concentrate on the techniques, and my tag includes the faux porcelain flowers (I also used Primas, plus some others found in my stash), as well as the tissue paper background.  Instead of a spool, I placed my bouquet in one of Wendy Vecchi's art parts....the flower pot, which was gessoed, inked with the new peacock feathers distress ink, dusty concord and (also new) shaded lilac.  It was then stamped with one of Wendy's fab backgrounds with berry purple archival ink.


The sentiment is a Wendy stamp.  Next, a close up of the flowers.  The small ones started out purple, but the others were white, and I tinted them with two of the new distress inks.....shaded lilac and squeezed lemonade (which is a great yellow) before dipping them in the melted UTEE.  Please click on the link to Tim's blog (above) to see the step by step details for this technique.


Since digging out the melt pot and actually using it is not an everyday event around here, I wound up making way more flowers than I needed, so I thought this would be a great opportunity to participate in the current challenge over at the Wendy yahoo group.  The theme is ATCs and the only rule, other than sticking to the theme is to use at least one of Wendy's stamps.  I did that, and more, and also included more art parts than you'd think would fit on a 2 1/2 x 3 1/2" piece.


The scallops, leaves and vase are all art parts.  Actually the vase started out in life as the base for a lamp, but I easily sliced off the lampshade.  I used pretty much the same colors on it as I did on the flower pot and added a dusting of lemon sparkle perfect pearls (which goes so well with the touches of squeezed lemonade distress ink I used throughout the ATC. 

I tried faux porcelain flowers once before with less success.  The difference this time, I think, is that I really filled the melt pot with UTEE.  It works much better if you can actually submerge the flowers into the UTEE.  It still requires a little finesse, and Tim's blog has some helpful hints,.

As luck would have it, this week's challenge at Simon Says Stamp and Show is "anything goes."  So, I'm submitting the ATC there as well.

And now, back to working on some of my unfinished "masterpieces," LOL.


Tuesday, October 4, 2011

Cruisin' the Caribbean With Tim!

My body may be back in NY, but my head sure isn't.  What a wonderful week we had on the beautiful Freedom of the Seas.  But, the journey began before we got onboard.  First of all, a few weeks prior to sailing we received our cruise documents and the name badge holder from ScrapMap:


And inside the zippered compartment was the booklet showing which group we were in and the schedule of classes.  For the first time, we wouldn't have to wait until we were on the ship to get that information.  Whoo Hoo!  I could see right away that I was in the class group with just about all my favorite peeps.

I made some ATCs and pins to trade and just give away.  Here is my ATC, front and back (with apologies to The Beach Boys):


This is the pin I made.  I used an inchie stampboard and the cool Lady Liberty stamp I received from Gloria during last year's cruise.


And here is how I presented them:


I just did a simple ATC and attached the pin right to it.

I also wanted to give a little something to both Tim and Mario.  Knowing how they both are into Starbucks, I thought coffee cup cozies (if that is in fact what they are called; I really don't know) would be nice.  I had some NYC fabric from the City Quilter and actually sewed the suckers.  I am no seamstress and the stitches are wonky, not to mention I sewed Mario's so the writing is all upside down, but I think the graphics are nice enough to compensate for my lack of sewing skills.  Oh, and let me mention that they are reversible.  Here they are, first Tim's, then Mario's:


My friend and cabinmate Pat and I left for Florida a day before the cruise began, and stayed at a Disney resort....Port Orleans.....fun place, one big Mardi Gras, and upon entering we received these, to get into the spirit of things:


I thought I took some photos while there, but apparently I left that task to Pat, so whenever she gets her pictures uploaded I'll share them, but all I have are these two of our room.....and our luggage.  Why I thought the luggage was important to document, I don't know.


Saturday night we met up with Elena and Bernie and had a FABULOUS dinner at Joe's Crab Shack in Orlando.  I've wanted to eat there for the longest time, and really enjoyed it.  Thanks, guys!  Again, no photos taken.  What was I thinking?

Finally, Sunday arrived, and Elena and Bernie picked us up and we drove to the ship.  We were onboard in time for lunch, our cabins were ready right after, and our bags came fairly quickly as well. Pat and I were unpacked and settled in before dinner.  Afterwards we had the welcoming reception where we were introduced to Tim's great team, and had the opportunity to swap and get together with both old and new friends.  Here are some of the swaps I received.  I say some, because I keep finding more, hidden in pocket and luggage compartments, so I'm sure there are more.


I wasn't part of the organized charm swap, nor did I make any charms, but I still managed to receive quite a few from some very generous cruisers.  These are only a few.....the rest made their way into a project several days later.


And then, everyone who is a member of ATT got into this group photo with Tim.  Notice all the official ATT t-shirts?  Being tall, I am somewhere in the back row. 


Check out my friend Val's blog for a good look at the ship.  Clearly  she was better at remembering to take photos than I was.

To be continued......


Saturday, June 18, 2011

Another Storage Solution

I thought I'd share with you another storage solution......how to keep your special ATCs together.  Now, I do have a 7 Gypsies ATC spinner, but it is so crammed full of them I can't even see them any more.  And certainly there is no room for any additional ones.

The ATCs I'm talking about are the ones I received from my cruise mates on last year's Tim cruise. I wanted to put them in a book, but didn't want to use adhesive on their backs.  Gotta be able to flip them over and see who did them.  Let me explain a bit about the book.  Weeks before sailing I decided to make a travel journal.  I altered an existing book for this purpose.....glued some pages together for added strength,  removed some pages,  gessoed all the pages and very lightly decorated them with inks, paints, stains and glazes.  This is the cover, and in case you're wondering why the L in England is off to the side, go ahead and have a good laugh at my expense.  I think it was literally weeks after completing it before I noticed that I had left the L out.  I wasn't about to re-do it, so I just put the L next to the rest of the word. I was so proud that all the letters fit on the cover so nicely.  Hah!  But, I digress.....


And here are a few of the pages after they were decorated, or I should say, prepped for journaling:


Why are they blank, almost a year after the cruise?  Well, the very first project we did with Tim was a travel journal, so I used that for my notes and memorabilia, and decided to use the one I'd made to hold my ATCs.  But I couldn't come up with a satisfactory means of keeping them in the book.  You know I'm a big proponent of using what I have, and what I have is a great big box of 3 1/2 x 5 1/2" coin envelopes.


Just the right size.....first I sealed the flap shut.  Then I cut the envelope down the middle:


I used a 1" circle punch to create a little half circle on the tops....makes putting the ATCs in and removing them so much easier.  


I used a very strong adhesive (with my Scotch ATG) to attach the holders to the pages.  Two fit well on each page in my 5 1/2 x 8 1/2" book.  I did minimal decorating of the envelopes.  I was just anxious to finish this project and get my cruise ATCs in their new home, but naturally you can ink and stamp and emboss as much as you like.   Here are some sample pages:


And you can see that I am still stencil-crazy.  Each and every page and most of the envelopes have some sort of stenciling on them.  Love, love, love those stencils!

If I had more ATCs to store I could have put envelopes on both sides of the pages, but as it is, they all fit well with this layout and any time I want to relive those wonderful memories I have these precious little works of art all in one place.